
Don’t Fear The Sourdough
This is your ultimate guide to sourdough starter and becoming a super healthy sourdough baker extraordinaire!
Sourdough can seem like a daunting baking challenge, but I’m writing this guide to show you how easy it is.

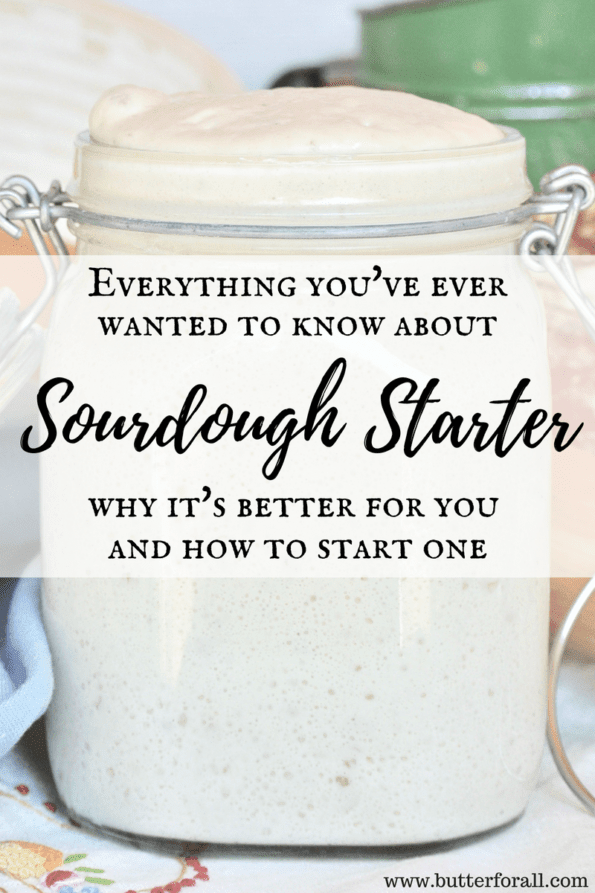
I will explain what sourdough is, how it works, and how to make it work for you. If you ever feel intimidated during the sourdough process just remember that up until less than two hundred years ago, all leavened bread was made traditionally with wild yeast and bacteria (sourdough)!
My sourdough is my pride and joy. I bake with it at least once a week and it’s become a part of my family and part of my history and evolution as a chef.
It is my mission to transform every recipe that uses leavened wheat flour into a sourdough recipe.
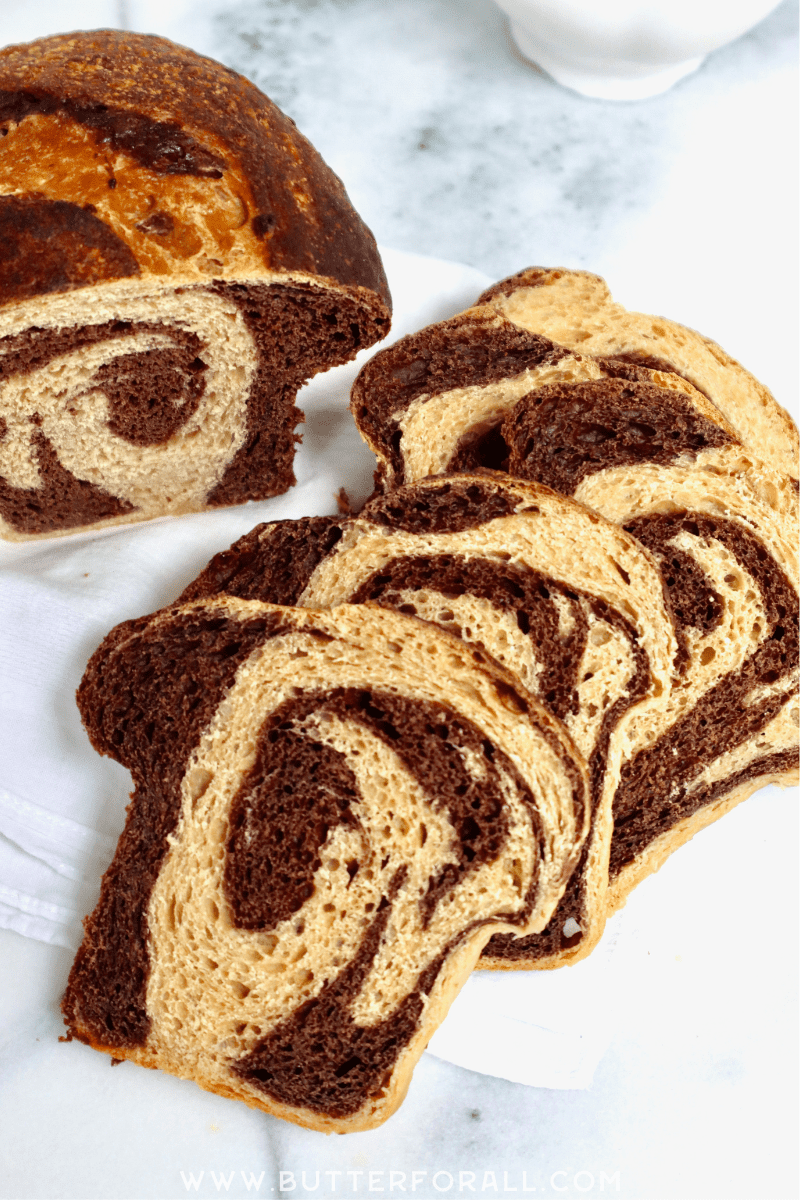
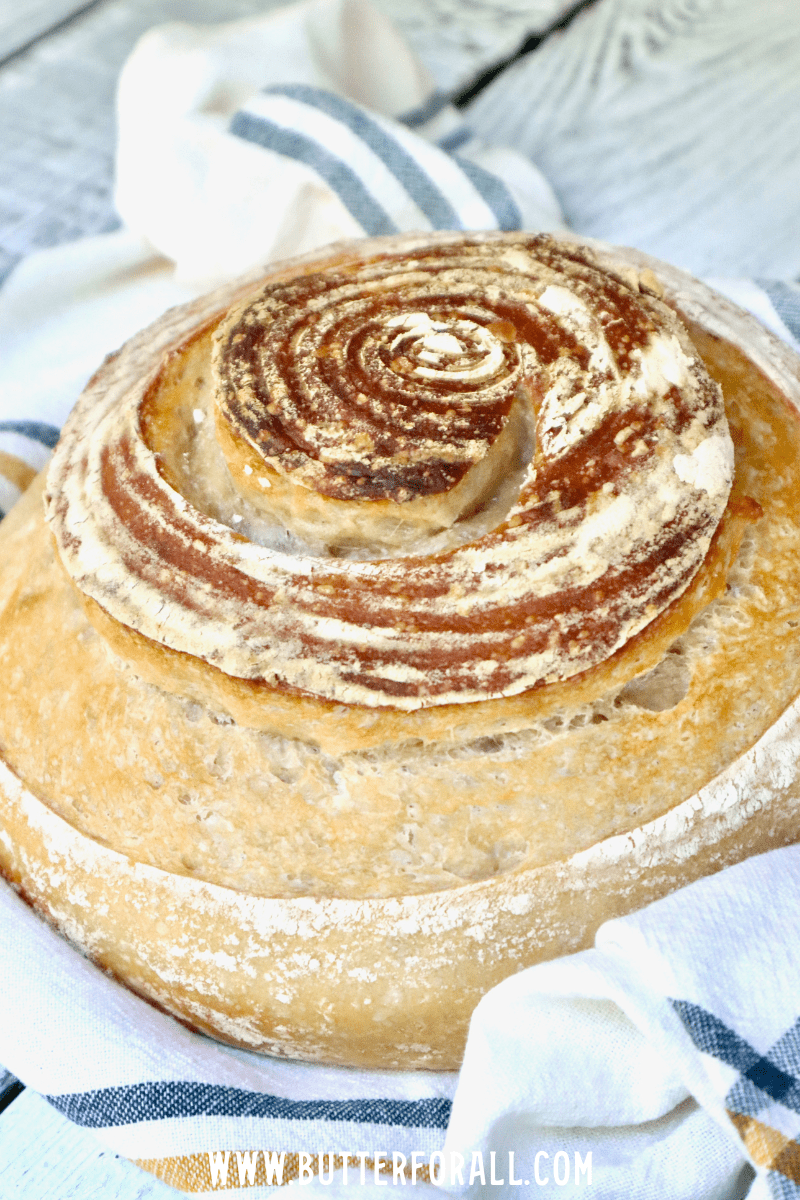
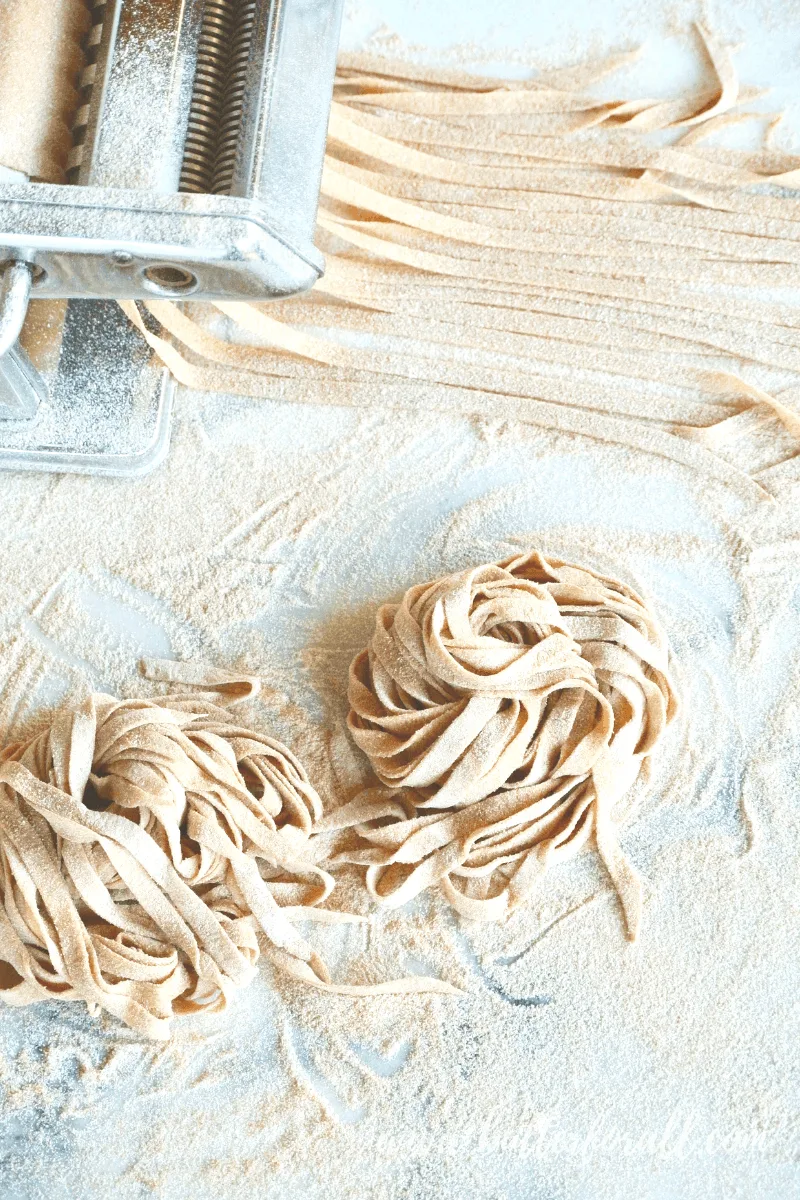
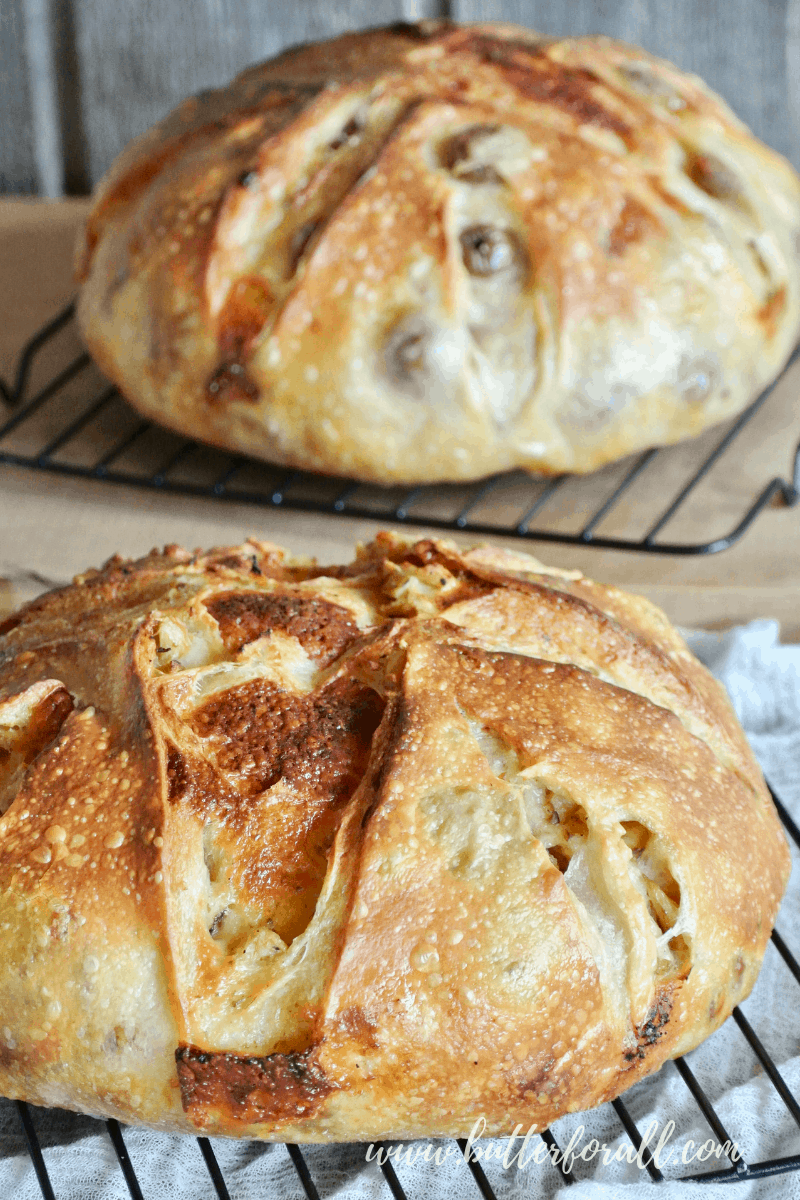
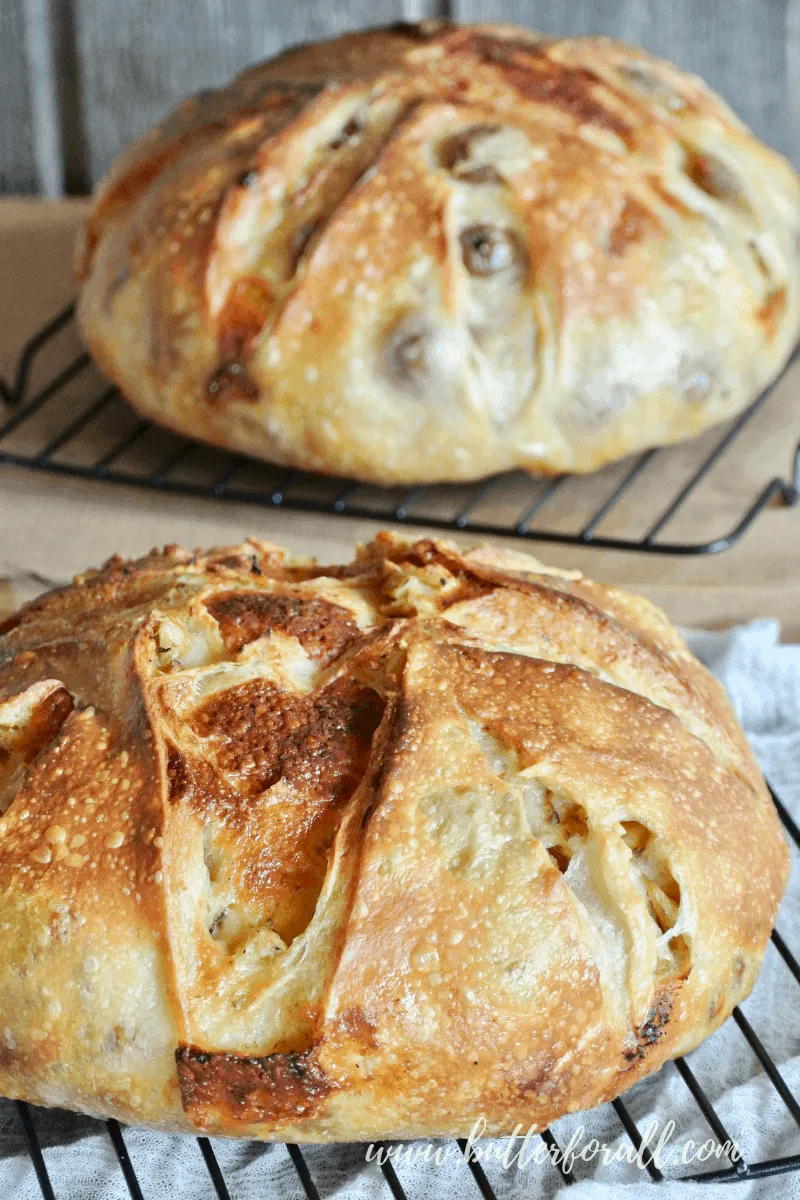
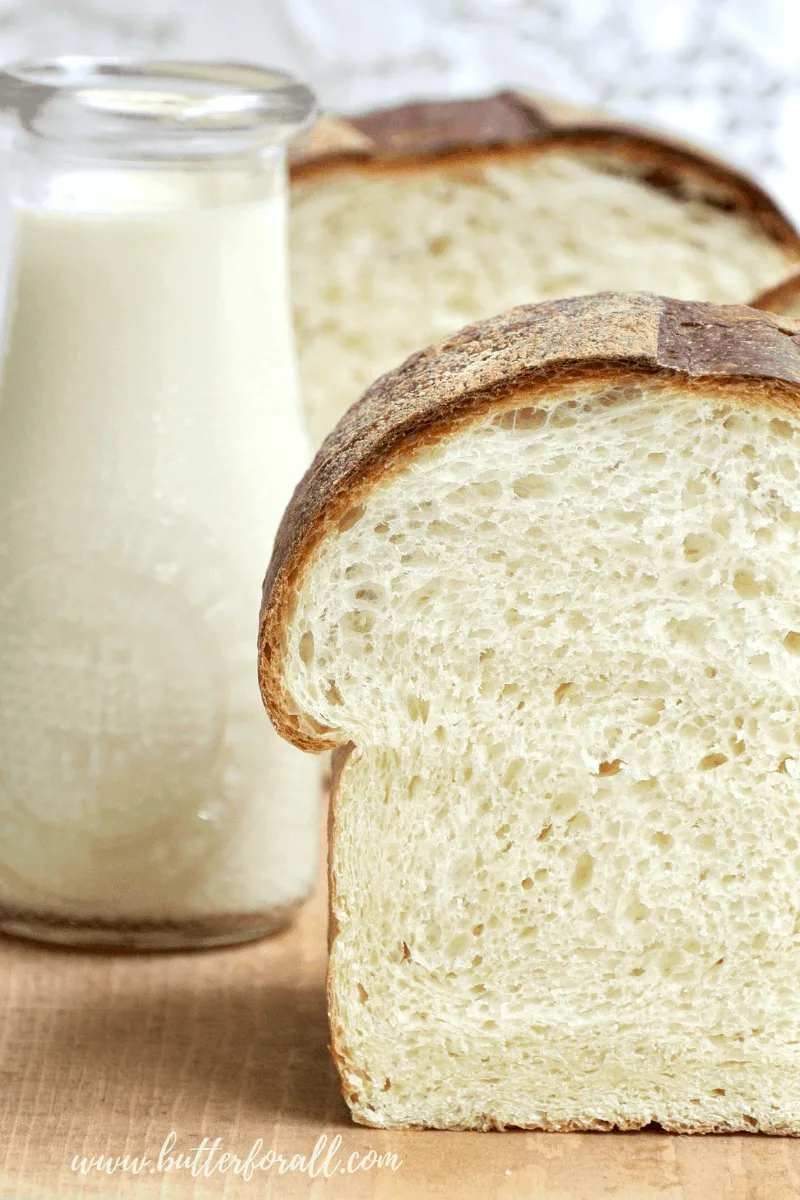
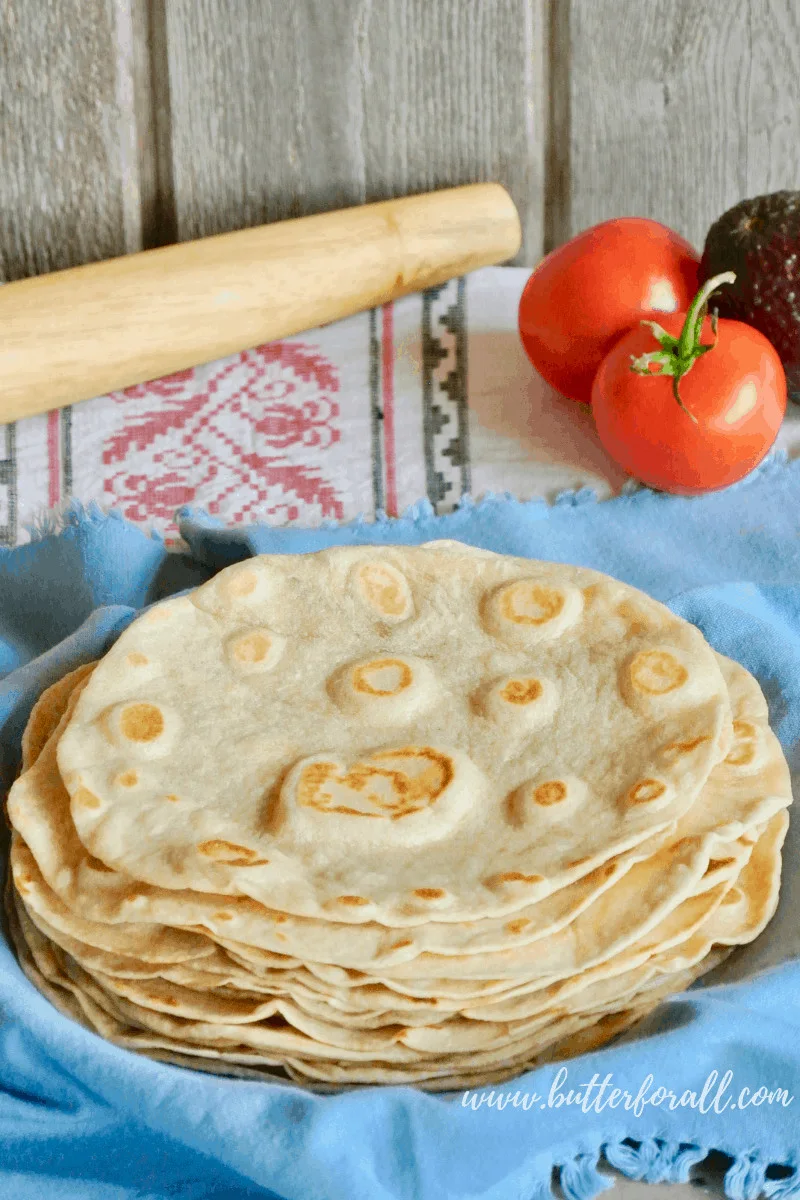
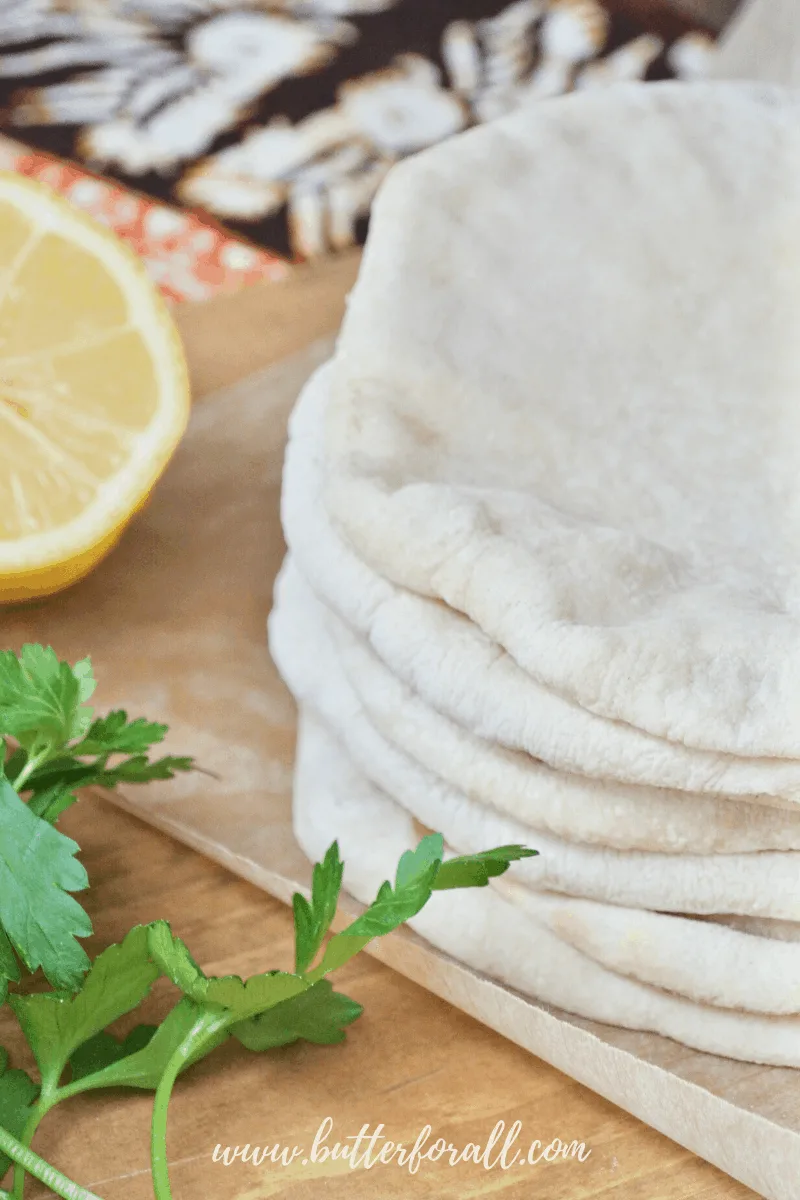
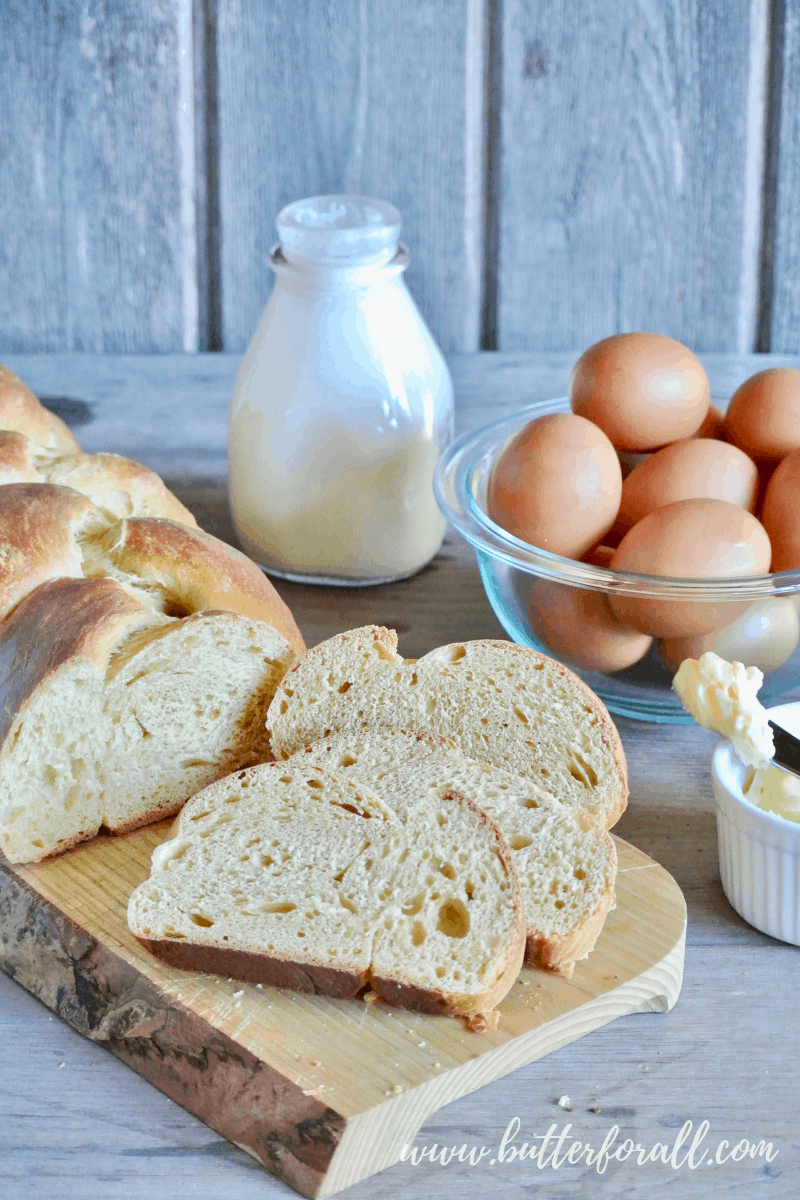
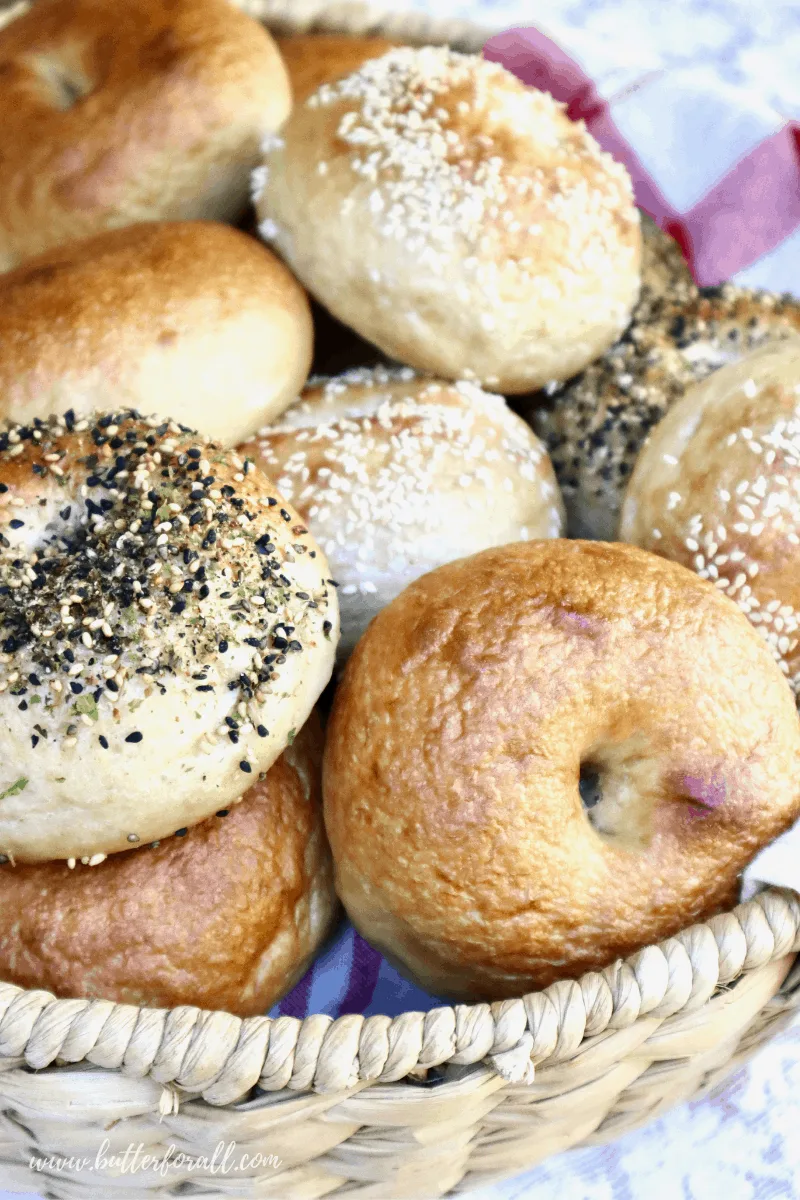
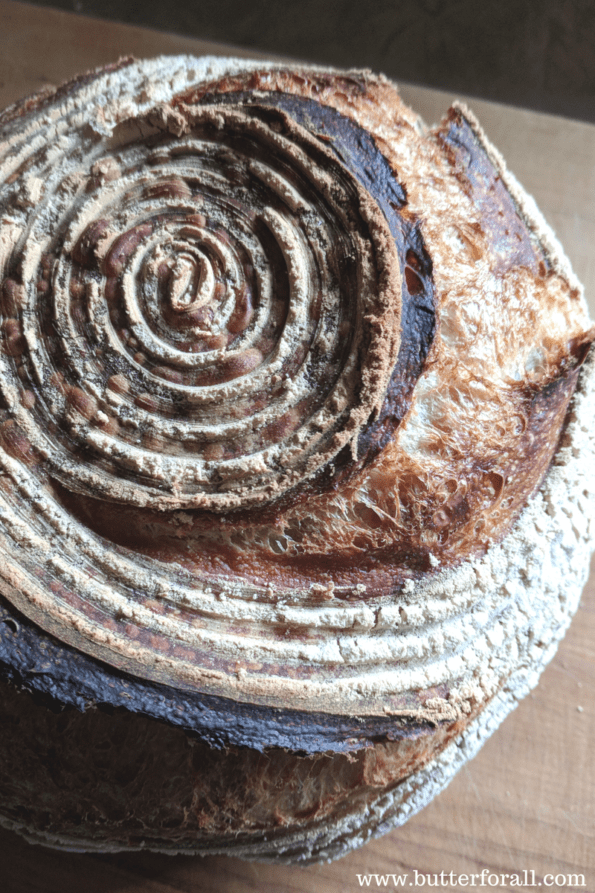
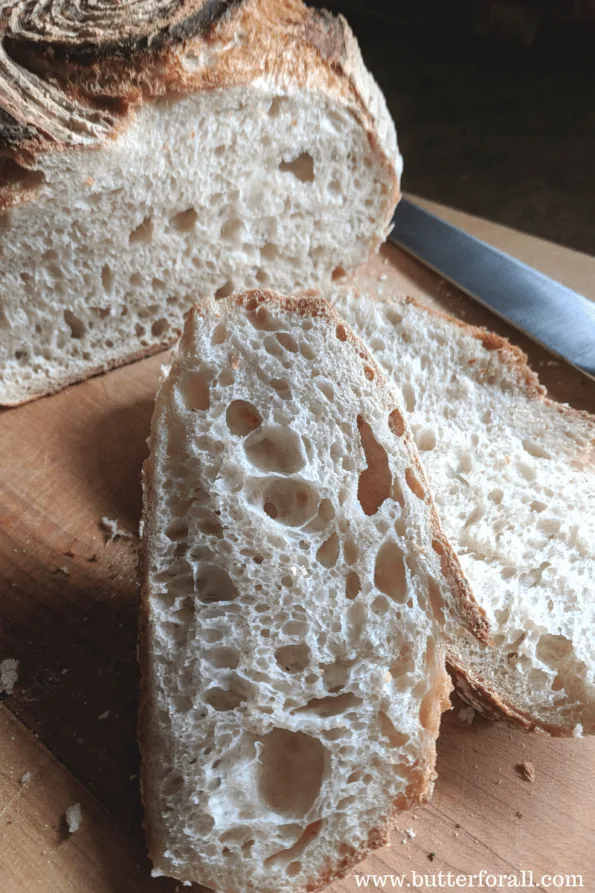
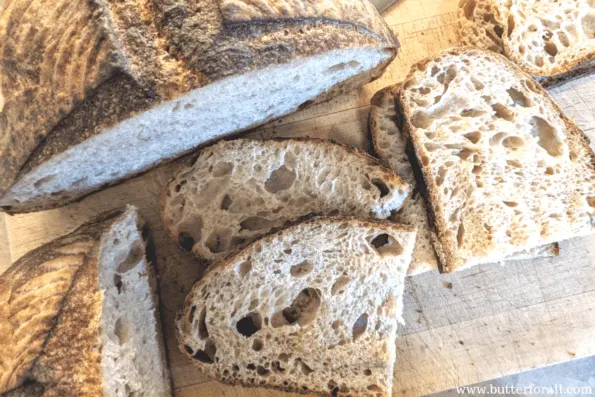
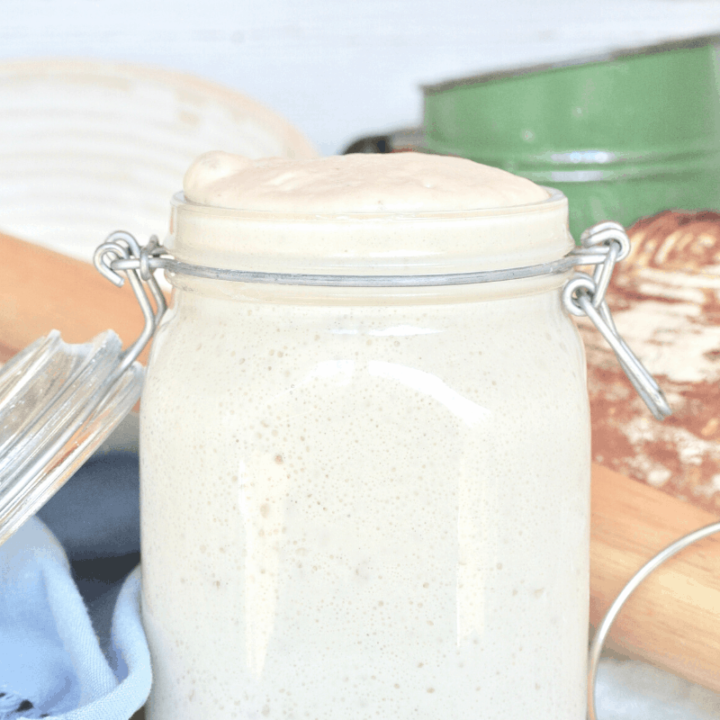
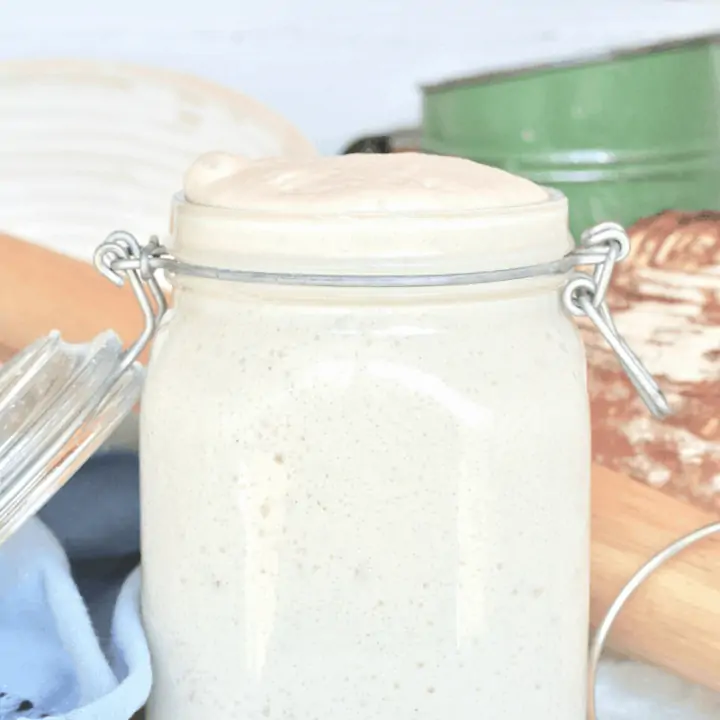
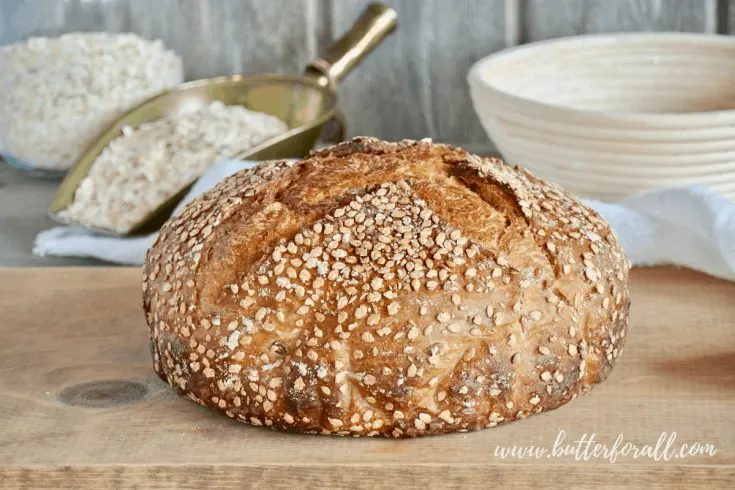
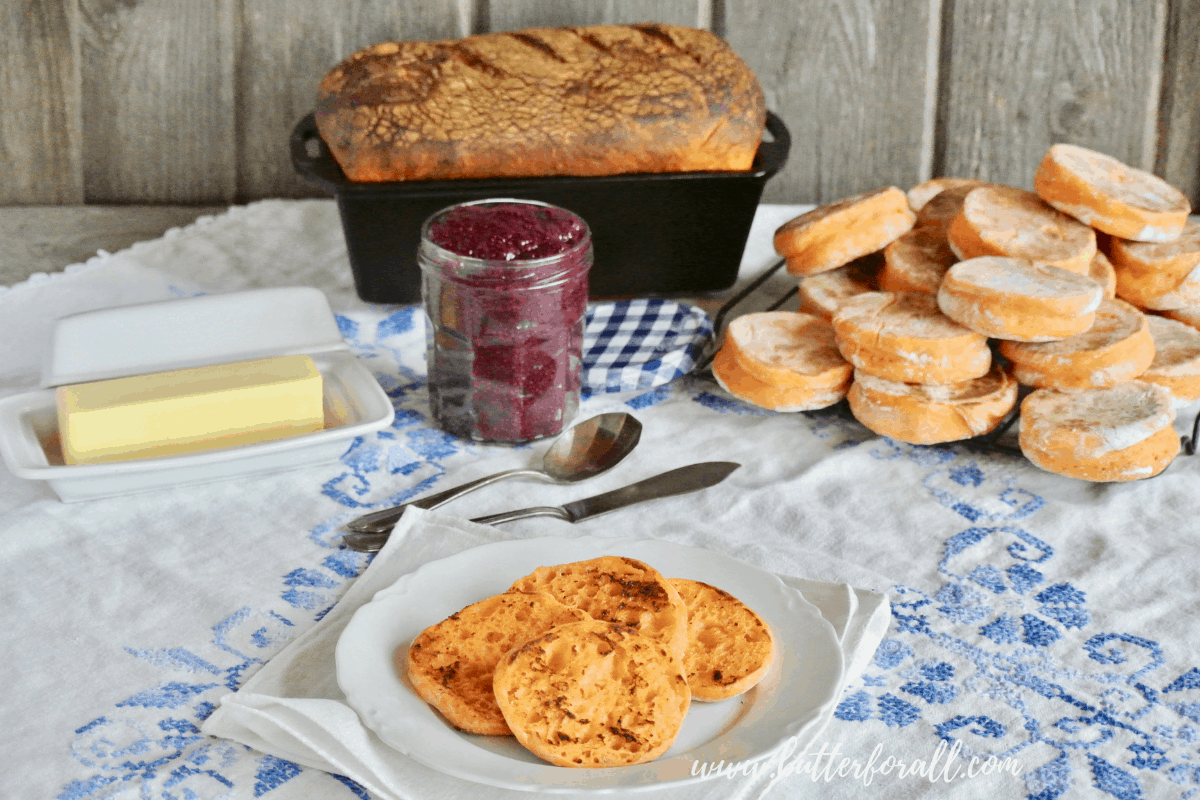
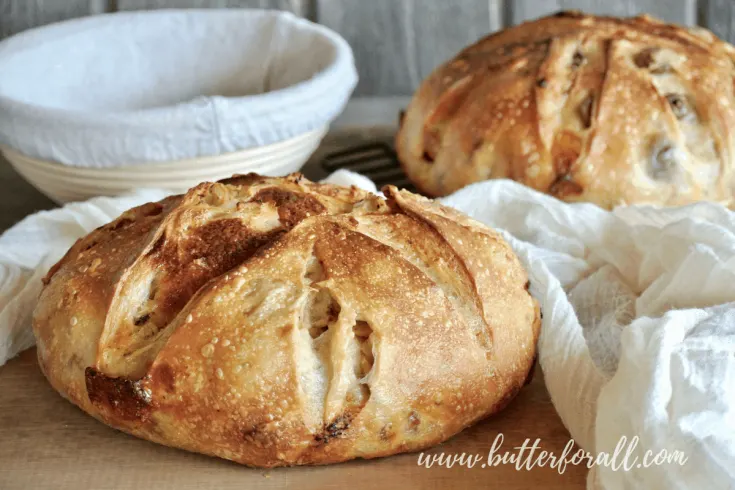
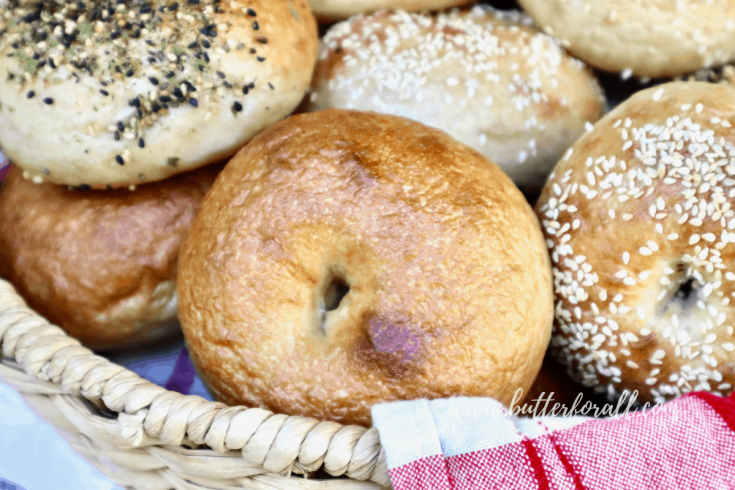
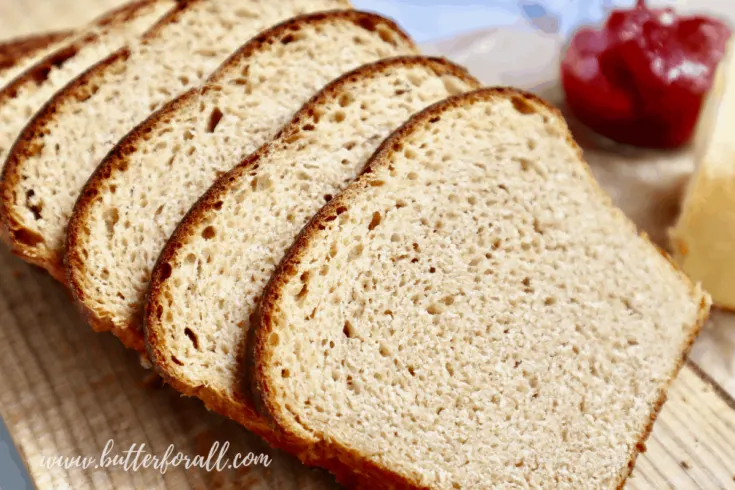
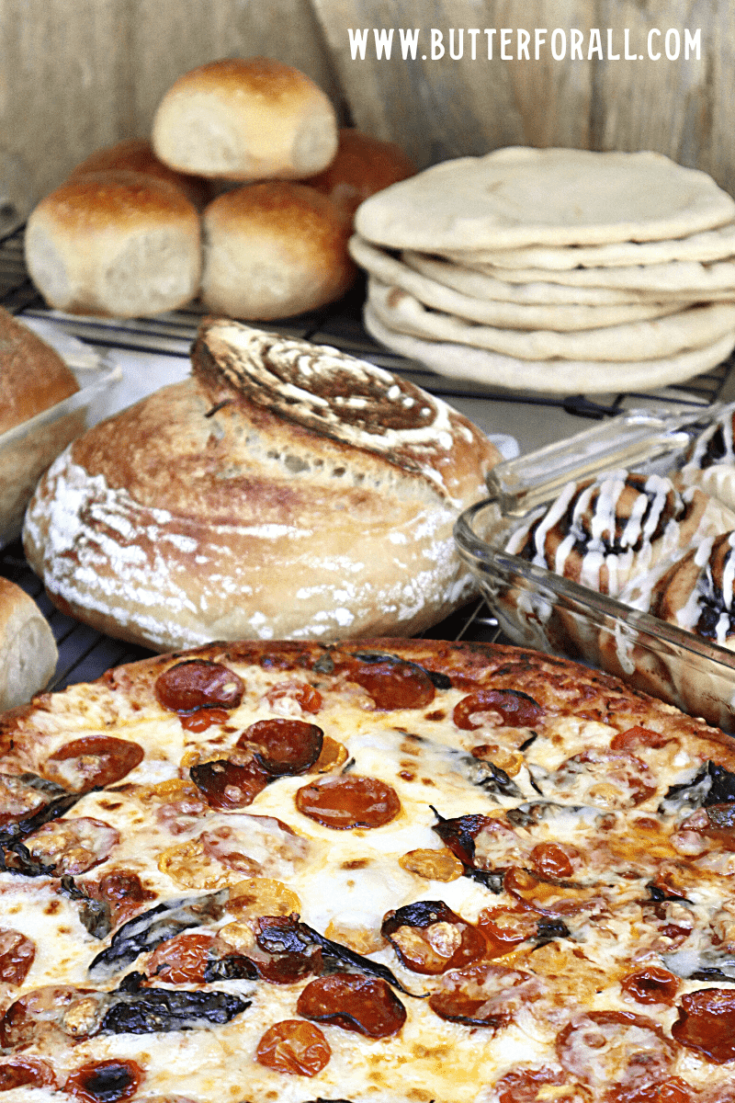
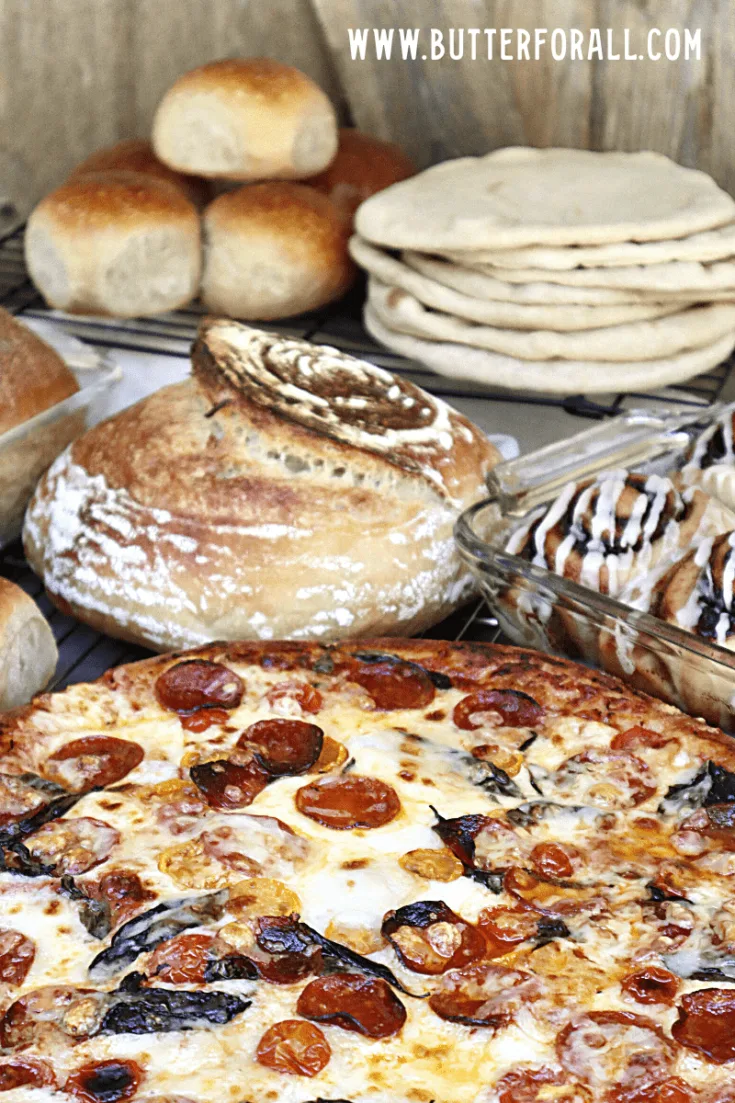
Here are examples of some of the beautiful baked goods you can make with a sourdough starter. You can find over 70 sourdough recipes on Butter For All!


What Exactly Is Sourdough?
Let’s Start at the Beginning.
Sourdough is a combination of flour, water, wild yeast, and bacteria that live in symbiotic harmony.
Wild yeast is responsible for leavening (rising) dough by producing carbon dioxide.
The leavening process starts to happen when the wild yeasts break down the sugars in the flour, predigesting it and using it for energy. The sugars in the flour feed the wild yeasts and allow them to multiply.
While the yeast is multiplying it is producing carbon dioxide as a byproduct. Carbon dioxide is responsible for making the bread rise.
This “leavening” happens when the carbon dioxide gas is trapped under the network of gluten protein that is produced by mixing flour with water.
Bacteria are responsible for souring the dough by producing lactic and/or acetic acid.
The beneficial bacteria in sourdough produce the lactic and acetic acids that give sourdough breads their classic sour flavor.
These beneficial acids also neutralize the nutrient-blocking phytic acid that is naturally found in the hull of all grains.
Lactic Acid Breaks Down Gluten
Gluten is a kind of protein found in all wheat grains. It forms long protein strands when mixed with water, thus giving bread the structure it needs to trap the gasses of fermentation.
The hard-to-digest gluten protein is predigested by the lactic acid during fermentation. It is then broken down into easier-to-digest proteins and enzymes while retaining the important structure that gives bread its shape.
Flours that are organically grown and have a higher percentage of bran and husk will have more of their own wild yeasts and bacteria attached to the flour. That is why using a whole organic grain like whole wheat or rye is recommended for starting a starter from scratch. Even so, some wild yeast remains in hulled flours, so it is possible to start a starter with just organic white flour.
Wild yeast and bacteria are everywhere. I mean everywhere! It’s on all wild fruit and veggies and is responsible for the beginnings of fermentation. A fallen fruit in the organic orchard will ferment just the same as a fallen fruit in the jungle.
Yeast really likes sugar, so it can be found in higher concentrations on fruits — think wine grapes with their white yeasty skins. Wild yeasts were responsible for the first alcoholic beverages like wine, beer, and mead and have been utilized for leavening bread for countless centuries.


Important Sourdough Bread Terminology
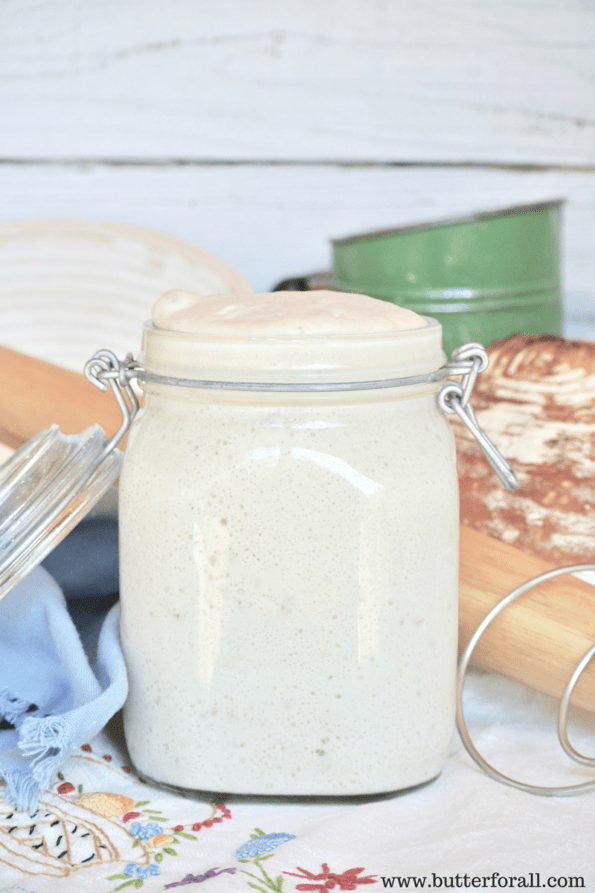
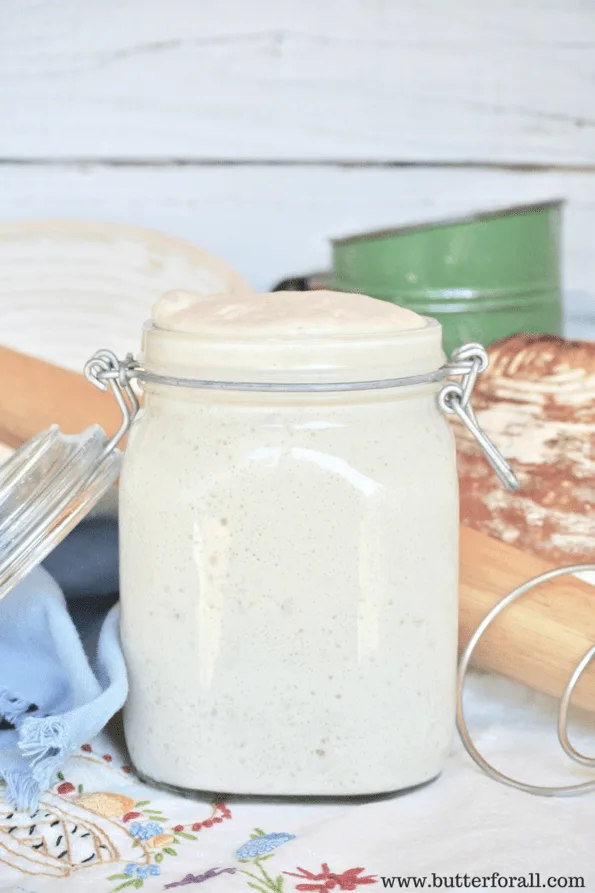
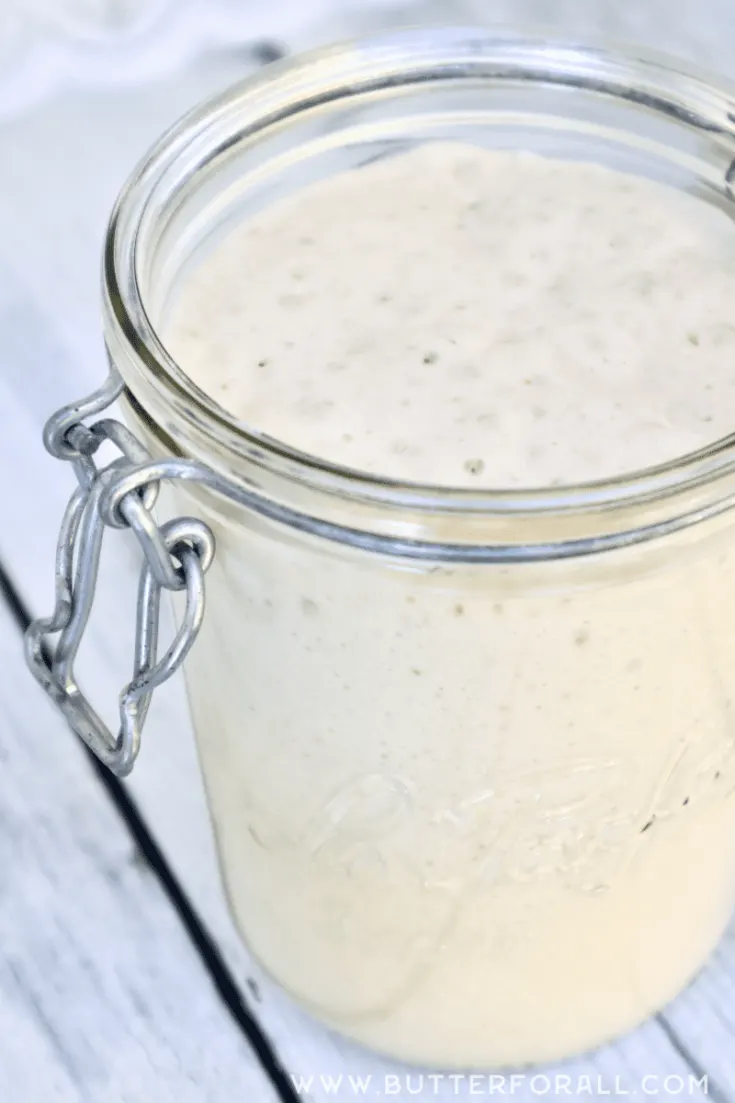
Starter – A continuous mixture of flour, water, wild yeast, and bacteria that is left to ferment. Starter supplies the yeast and acids needed to ferment any sourdough recipe. Portions of the active starter are removed to make bread and other baked goods and then replaced (feedings) with fresh flour and water. Starter is also referred to as “the mother” or “leavan.”
Discard – The portion of starter removed before feeding. Typically at least 50% of the starter is removed to make room for fresh flour and water. The action of removing a portion of fully fermented starter and replacing it with fresh flour and water gives the starter fresh sugars to consume and revives the starter prior to baking. Discard is not always discarded, it can be used to make pancakes, waffles, crackers, and tortillas. Discard can also refer to any extra sourdough starter you want to use up, regardless of age.
Feeding – The process of adding fresh flour and water to the starter to revive it before baking.
Levian – A small portion of stiff dough (usually around 60-70% hydration) made with flour, water, and starter. The levian is left to ferment for up to 24 hours at room temperature before using it to start a loaf of bread.
Hydration – The percentage by weight of water to flour in a starter or dough. “100% hydration” is a starter/dough made with equal weights of water and flour. Typical bread dough is usually 65-85% hydration. The higher the hydration a dough is, the larger the air pockets will be, but also the harder the dough will be to work with. My own personal recommended hydration for sourdough starter is 100%. This makes it extremely easy to divide and multiply for recipes. My bread loaves are around 75% hydration; they are easy to work with but still produce a nice open crumb.
Crumb – The texture of the baked good’s gluten pockets inside the crust. An open crumb has large airy pockets while a dense or tight crumb is heavy without any air pockets.
Leavening – The process of rising the bread through fermentation and trapped gas.
Fermentation – The act of fermenting a food with yeast and lactic acid bacteria. Fermentation preserves food by creating an acidic or alcoholic environment where potentially harmful bacteria cannot survive.
Proofing– The time it takes for a dough to rise. Typically a bread will proof two times before baking. The first proof happens after the ingredients have been mixed and kneaded and usually requires the dough to at least double in volume. The second proof happens after the dough has been shaped and again can be as long as it takes for the dough to double in volume before baking. Slow proofing can be done in the refrigerator. Called “retarding,” it gives the dough more time to develop and can help you time your baking.
Kneading – Kneading dough can be done by hand on a floured surface, in a bowl, or by machine. Kneading is done before the first fermentation and is the action that produces gluten. It is done by folding one side of the dough toward the middle and pressing it down, turning the dough one-quarter turn, and repeating the fold. These motions are repeated until the dough is smooth and elastic and passes the windowpane test.
Windowpane test – The windowpane test is used to determine if a strong gluten structure has been achieved. Take a small piece of dough and flatten it in your fingers. Gently pull the dough out from the middle to the edges. If you can stretch the dough out into a translucent layer (hence the name windowpane) then the dough has a strong gluten structure.
Stretch and fold – An important kneading technique that encourages long gluten strands. The dough is left in the mixing bowl, taken by hand, and pulled out in one direction before folding it over the middle. The dough is then turned 90 degrees and this process is repeated in the remaining three directions. Stretch and fold takes the place of common kneading and can happen anywhere from three to 10 times during the initial fermentation.
Oven-spring – The quick and significant rise when a dough is placed in a hot oven. As the yeast warms it gets really happy and starts to produce a lot of carbon dioxide very quickly, creating a big “spring” in the bread. Oven-spring is best observed when dough has been scored.
Scoring – Slashing an uncooked dough with a very sharp blade right before baking. Scoring has two main functions, decoration and allowing for more oven-spring.
Docking – Pricking a flat dough like pizza or crackers with a docking tool or fork. This keeps the dough from bubbling up when it is cooked.
Carryover cooking – The cooking that continues inside the bread when it’s removed from the oven. Hot steam is trapped inside the crust of the bread and will continue to cook the dough as it cools to room temperature. I try to never cut a hot loaf of bread because it will change the texture of the whole loaf. When the steam is released from the bread it evaporates and the crumb will dry out much more quickly than a loaf cooled to room temperature.
Boule – The French word for “ball,” used to describe an artisan round loaf.
Batard – An oblong shaped loaf.
Baguette – The French classic, a long and narrow loaf.
Banneton – A bread proofing basket usually made of concentric circles of willow branches. Bannetons are used in bread making at home and in commercial bakeries. They are especially helpful in supporting high hydration (soft) doughs so they can rise in a uniform shape. They give bread a distinctive artisan appearance.
Shaping – Shaping the dough is done after the first ferment and the punch down. It is the process that shapes the dough into a bun, boule, batard, baguette, sandwich loaf, roll, etc. Shaping is an important step that allows the dough to rise in a uniform and desired way by creating a tightly pulled outer layer of dough.
Punch down – To punch down a dough is to deflate the gasses from the dough. This step is usually preformed after the first proof and before shaping. It typically involves removing the dough from the proofing bowl to a floured surface. The dough is then pushed down with your fists, deflating any big gas bubbles. The dough is then rested for a few minutes before shaping.
Why Should You Eat Sourdough? What’s the Difference Between Sourdough and Bread Made With Rapid Rise Yeast?
If you’ve been following along on my journey to health then you probably know that I soak, sour, or sprout all the grains, nuts, and legumes that I eat, usually with some sort of acid (typically whey from my raw yogurt). This soaking process does several different things, the most important being it neutralizes the naturally occurring phytic acid in these plant foods.
Phytic acid acts as an anti-nutrient, actually blocking nutrients and minerals from being absorbed in your digestive tract. In small quantities it’s not a huge problem but for many people the complex carbohydrates that are provided from grains, legumes, and nuts make up a large portion of their diets. That’s when reducing phytic acid becomes so important! This is really becoming a health problem when we talk about “plant-based” diets. Most modern people who practice plant-based, vegetarian, or vegan diets are often consuming much higher levels of phytic acid.
When you bake with sourdough the fermentation process is long, giving plenty of time for producing the lactic acid required for phytic acid reduction. It is for this reason that I am committed to baking with sourdough and use alternative flours like almond very sparingly.
On the other hand, rapid rise yeast consumes the sugars in the flour so quickly and without the benefit of lactic acid-producing bacteria that very little reduction in phytic acid occurs. This is a major problem considering the quantity of bread foods that most of the world consumes on a daily basis.
Almost all traditional peoples knew to soak and ferment the grains, nuts, and legumes they were consuming. And all bread was naturally leavened (like sourdough) up until the invention of rapid rise yeast in the 1860s. So for over 14,000 years of bread making, humans were utilizing wild yeast. And over the last two centuries we have almost completely abandoned these traditional ways. If you are starting to wonder if there is a correlation between abandoning our traditional food-ways and our declining health then you are on the right track.
To learn more about traditional peoples, what real traditional foods they ate, and why they had superior health please read Sally Fallon Morell’s new book Nourishing Diets: How Paleo, Ancestral and Traditional Peoples Really Ate


The sourdough fermentation process also breaks down gluten protein, making it much easier to digest!
Many people with gluten sensitivities are able to enjoy traditionally fermented sourdough bread! The longer the bread ferments, the more gluten protein is broken down. Real sourdough bread can be fermented for 12, 24, 36, 48, or even up to 72 hours!


Tools of the Trade — What You Should Have on Hand Before Beginning Your Sourdough Journey
1. Access to freshly milled organic flour. This will make all the difference in the quality of your baked goods. There are many types of wheat flour, ancient grains, and non-wheat flours that can be used for sourdough. I will list my top five kinds of wheat flour below.
- Organic All-Purpose: This is a perfect flour for feeding your starter and baking pies, cakes, muffins, and tortillas.
- Organic Bread Flour: Bread flour is slightly higher in protein than all-purpose flour, which creates more gluten and traps more gasses thus giving bread more structure and loft. Bread flour is great for baking soft and lofty loaves of bread with a nice open crumb.

- Organic Whole Wheat: Whole wheat flour has the bran and husk of the flour kernel milled in. It has a sweet and earthy flavor with more natural fiber. I like to add up to 50% whole wheat flour in many recipes. The bran of the flour kernel will interfere with gluten production, which is why 100% whole wheat bread is much more dense with a tighter crumb structure. Whole wheat flour is great for adding to any recipe to give it more flavor and texture.
- Organic Triple 200 Wheat Flours: Triple 200 flours are still whole wheat but they have been passed through a 200 gauge sieve three times, making the flour extra soft and light. They are fabulous for adding whole wheat flavor with a very delicate texture. Triple 200 is perfect for adding whole wheat flavor to delicate cakes, doughnuts, bread, and cookies.

Copyright Butter For All
- Organic Heirloom and Ancient Grains: Heirloom and ancient grains are making a huge comeback as people start to reinvest in the traditional food-ways of our ancestors. Einkorn, Emmer, Spelt, and Kamut are just a few of the choices on the market. They all have varying levels of gluten, typically lower than industrialized hybridized wheat. Heirloom grains can have lots of different flavor profiles as well, from sweet to smoky to nutty. Once you are feeling confident with your baking skills it is fun to add these ancient grains into any of your baking projects!
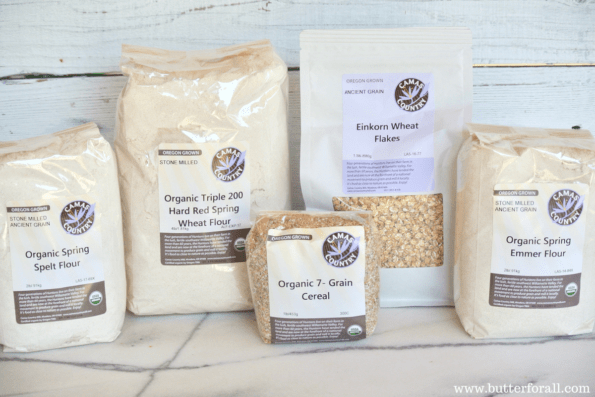

If you don’t have access to freshly milled local flour there are several brands that I have personally had great success with.
2. Fresh unchlorinated water. Chlorine can really harm the growth of wild yeast and bacteria, not to mention it’s gross. Chlorinated water can be left to off-gas for 24 to 48 hours in an open glass container if needed. But the best thing you can invest in is a high powered portable water filter. I would recommend The Berkey Water Filter to anyone. It’s portable, has a great capacity, and the filters last years with proper care. It is also so reassuring to have the Berkey in case of emergency situations. Please do not use bottled water. Plastic water bottles are one of the most unsustainable choices that people make.
3. A baking scale. This is such a crucial tool for baking exceptional sourdough. Can you bake good bread without one? Sure. I did it for years, but my bread was elevated to the next level when I started paying close attention to the hydration and weights of my recipes.
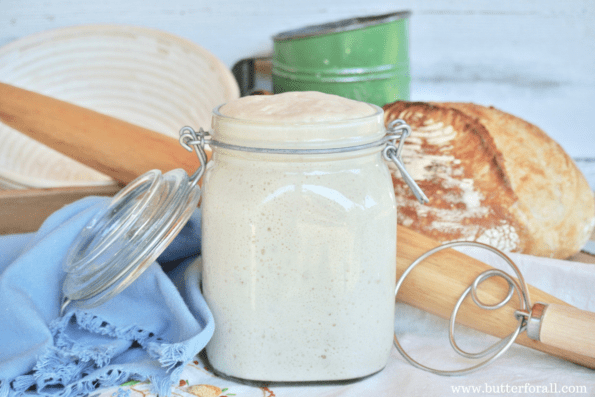
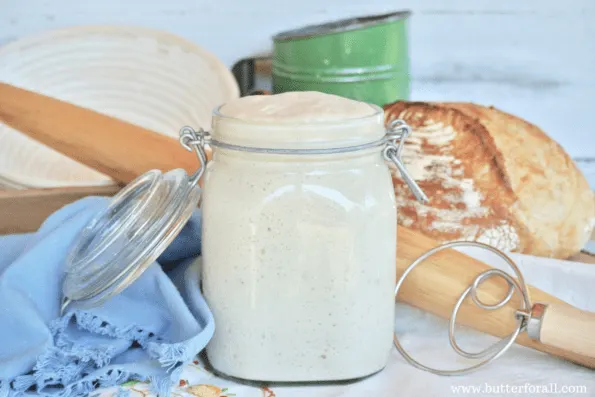
4. A glass storage container. The proper storage container for your starter is really important. The starter needs to breathe but shouldn’t be left open to the elements. Fruit flies can be a bothersome pest to sourdough and can contaminate a starter with unwanted bacteria. I choose to use a locking lid jar with the rubber seal removed. This allows the starter to breathe without it drying out or becoming infested with intruders.
5. A set of ceramic or glass mixing bowls. Sometimes the metal alloys found in aluminum or even stainless steel mixing bowls can have a negative effect on fermentation. I suggest a sturdy set of ceramic or glass mixing bowls to keep your starter in prime condition for baking.
6. A proofing basket (Banneton). Traditional proofing baskets made from willow are beautiful and functional. They give sourdough loaves an artisanal shape and texture. The lightweight willow is breathable and the shape of the basket supports the dough and gives the bread optimal conditions to rise to full potential.
7. A Dutch oven. I can’t stress enough how much baking in a Dutch oven improved my bread game. The Dutch oven traps steam inside while baking, keeping the crust soft and stretchy and allowing the bread to rise as high as possible. The lid of the Dutch oven is removed halfway through baking to allow the crust to brown nicely.
8. A dough whisk. This handy little tool is perfect for mixing doughs of all kinds. You can even use it to stretch and fold your dough.
9. Parchment paper. Parchment paper is a baking luxury that I highly recommend. It can be used to line cookie sheets when making crackers, in between balls of dough, or as a sling for transporting your delicate loaves to the oven. Make sure to look for an eco-friendly brand and reuse parchment whenever possible!
10. A bread lame. A bread lame is the tool used by bakers to easily hold a sharp razor blade for scoring bread. The lame gives you a nice handle and provides comfort and accuracy during the important scoring process.
And finally here are some fun optional additions to the sourdough baker’s tool chest.
A grain mill for grinding fresh flours from wheat, oats, and more, cast iron loaf pans; a baking stone for pizza and rolls; a stand mixer; baguette forms; and measuring cups, scoops and wooden spoons.
How To Start a Sourdough Starter
There are three main ways to start a sourdough starter: borrow, buy, or trap.
Borrow
My favorite method of acquiring sourdough is definitely from a friend. If you can find someone with a healthy, active sourdough starter who is willing to part with some then you can be baking as soon as the next day! Sourdough is a joyful and loving hobby and most sourdough bakers will be happy to share that passion with a beginner.
Buy
You can also purchase a dried starter from many different sources. My first starter was originally given to me as a gift from my husband before we were married. Little did he know how important that gift would be to our health! There are some really awesome choices for sourdough starter on the market and I will list a few below that I personally trust.
Trap
If you want to get super authentic you can start your own starter by trapping wild yeast off of wheat flour, fruits, herbs, or vegetables.
To start a starter with flour you will want to use organic, freshly milled flour if that is available. Flour that still has some of the hull will help you start a vigorous starter quickly.
Organic whole wheat or rye flour is a good choice for starting a vigorous starter. Rye flour tends to have plenty of wild yeast and bacteria and (in my case) makes a sweet-smelling ferment.
Again, any organic flour will work, but those that are milled with the hull start sourdough cultures faster.

From-Scratch Sourdough Starter
Easy instructions for cultivating your own wild yeast and bacteria strains to make a 100% hydration sourdough starter. This process takes at least fourteen days to complete so plan accordingly. You will end up with a baby sourdough starter that can be used for baking breads, cakes, tortillas and more!
Ingredients
- 575 g organic flour, divided over 14 days
- 575 ml water, divided over 14 days
Instructions
A Note on Choosing Flour.
Using an organic flour is always recommended.
All-purpose flour can work for sourdough starter, but to ensure you get a little boost of wild yeast, include a small portion of organic whole grain flour of your choosing to your first few feedings. You could use a typical whole wheat, rye, spelt, emmer, or other ground whole grain.
The amount of whole grain flour you use is not critical. You could successfully use only whole grain flour in this recipe, or a proportion of whole grain flour to all-purpose flour.
Different flours will have different flavor profiles, fermenting characteristics, and final outcomes. Once your starter is established I recommend keeping it fed with organic all-purpose flour, and saving your more expensive whole grains for building a sourdough levain (an off-shoot starter with unique characteristics) or baked goods.
Day 1
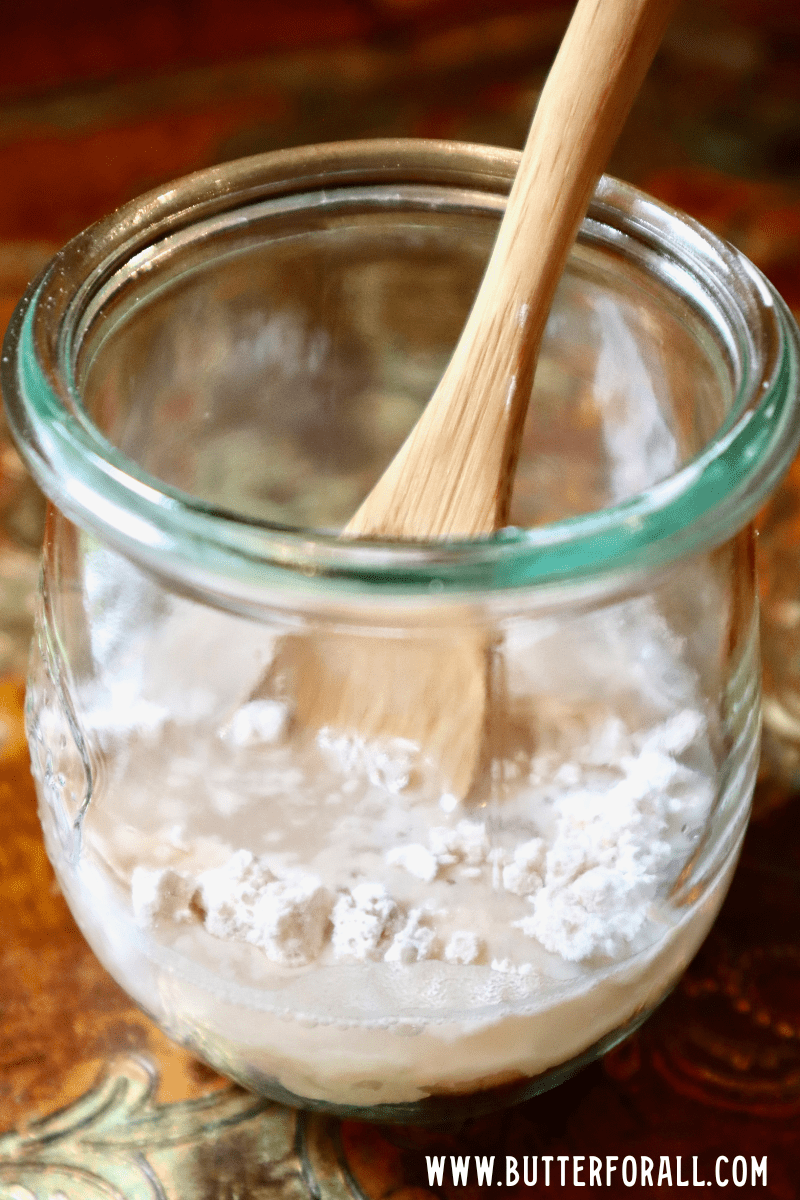
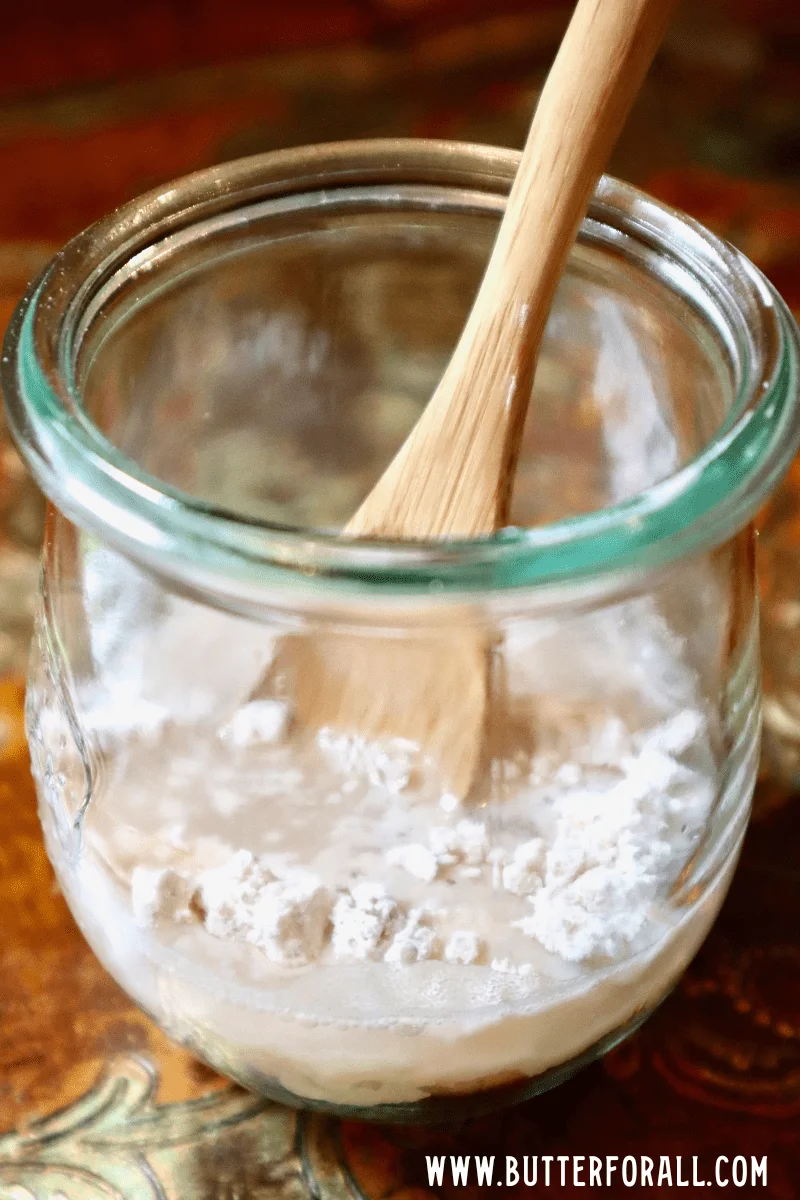
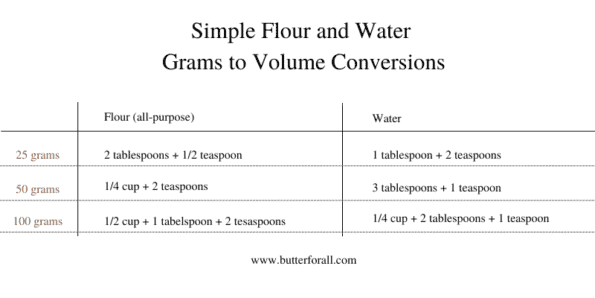
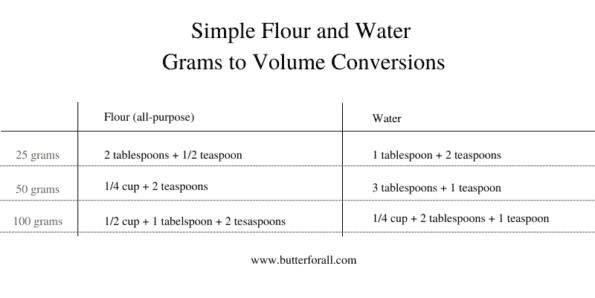
Mix 50 g of organic flour (1/4 cup + 2 tsp) and 50 ml (3 tbsp + 1 tsp) of water into a paste. Store it in a small clean jar with a loose fitting lid (not cheesecloth or other fabric covering). Keep your jar in a warm, draft-free place. This is the beginning of your starter!
If you'd like to add a small piece of yeast covered fruit to boost your starter, add it during the first mixing and remove it before the first feeding on day two.
Day 2 -7, feed your starter once a day.
- Every morning remove 50g of starter (half) from the jar and replace it with 25 g (2 tbsp + 1/2 tsp) of flour and 25 ml (1 tbsp + 2 tsp) of water. Stir your starter well and store it in a warm place.
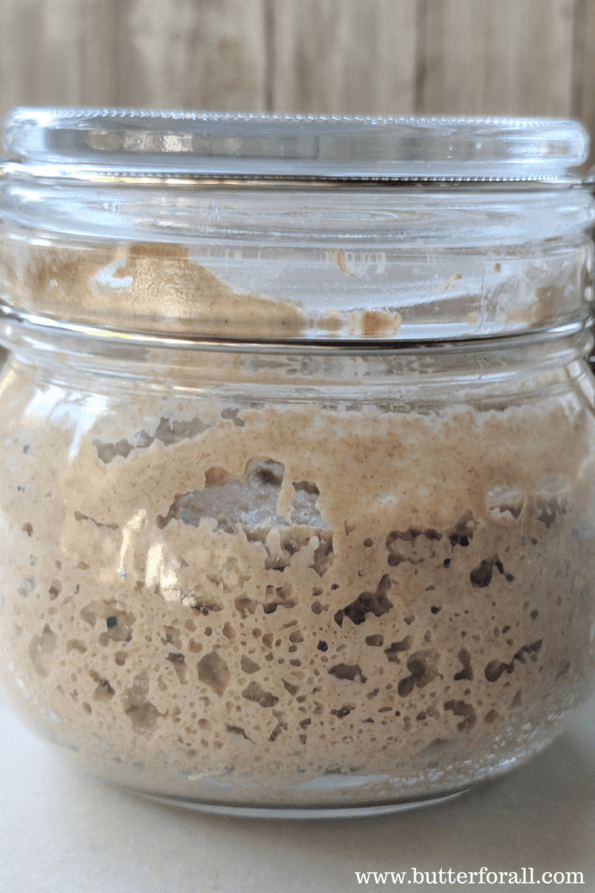
- By day seven you should be seeing some signs of activity. The starter should be bubbling a little, smell fermented (slightly sweet, sour, or alcoholic). You may even see it rise after feeding.
- If there is mold, off-color, or a bad smell do not continue the feedings and please see my troubleshooting guide.
Day 8-14, feed your starter twice a day.
- Every morning and every evening remove 50g of starter (half) from the jar and replace it with 25g (2 tbsp + 1/2 tsp) of flour and 25 ml (1 tbsp + 2 tsp) of water. Stir your starter well and store it in a warm place.
- During this critical feeding period you should start to see a lot of bubbling activity. Your starter will be ready when it is rising to double the volume between feedings
Day 15, and beyond.
Continue to feed your starter until it is responding accordingly. Once your starter is active, well balanced and is being used regularly feel free to store it in the refrigerator between uses.
You can find more information about continuing to build your sourdough starter in my guide: How To Feed, Care for, and Maintain Your Sourdough Starter
Notes
- Some people have found that their starter is ready to bake with by day 7. I add an extra 7 days of double feedings to insure that the starter is powerful, active, and ready for all the baking projects!
- Keep in mind, sourdough is as unique as you are. Results may vary!
- To build your starter up prior to baking just add a larger amount of flour and water to the last feeding.
- All cups and spoons measurements are approximate, please weigh your ingredients for accuracy!
Recommended Products
As an Amazon Associate and member of other affiliate programs, I earn from qualifying purchases.
-
 Jovial 100% Organic Einkorn All-Purpose Flour, 10 Pounds
 -
 King Arthur, 100% Organic Unbleached Bread Flour, Non-GMO Project Verified, No Preservatives, 2 Pounds (Pack of 12) -Packaging May Vary
 -
 King Arthur Flour, Organic All Purpose Flour, 32 oz
 -
 100% Organic All Purpose Unbleached White Baking Flour - 10 Pound
 -
 Mini Glass Jars for Dessert and Jelly - Weck Tulip Jars
 -
 Escali Primo P115C Precision Kitchen Food Scale for Baking and Cooking
 -
 Checkered Chef Stainless Steel Baking Sheet With Rack - Heavy Duty Half Sheet Pan for Baking with Oven Safe Baking/Cooling Rack
 -
 Parchment Baking Paper
 -
 Stoneware Loaf Baking Dish
 -
 9 Inch Bread Banneton Proofing Basket - Baking Bowl
 -
 Oval (13,8 x 6,1 x 2.7 Inch) Bread Banneton Proofing Basket
 -
 Camp Chef Home Seasoned Cast Iron Bread Pan
 -
 Tovolo Stainless Steel Dough Whisk, 12 Inch
 -
 Danish Dough Whisk and Bread Lame Set Double Eye
 -
 Pyrex 8-piece 100 Years Glass Mixing Bowl Set (Limited Edition)
Reviving a Dehydrated Starter
Check out my instructions for reviving a previously dehydrated sourdough starter.
Gluten-Free Sourdough Guides
Whole New Mom – Super Easy Gluten-Free Sourdough Starter
Fermenting For Foodies – Gluten-Free Sourdough Starter
The Difference Between Active Sourdough Starter and Discard
In my recipes I use the term “active sourdough starter” to indicate a starter that is at its peak fermentation. This is the best time to use the starter for baking breads and in recipes that will undergo further fermentation. The starter is active, has doubled or peaked, and is ready for more fermenting.
But I also use “discard” in many of my recipes! Sourdough discard is fully fermented and therefore it is extremely digestible. It has usually spent some time in the refrigerator so it will be deflated, thicker, and more sour. Some people choose to throw discard out before refreshing their starter but I choose to use this extra fermented flour in some of my recipes. Discard is my solution to having wheat flour baked goods that don’t need any extra fermentation time or those that will be fermenting for a very long time. If you are baking often enough, then discard doesn’t really need to be discarded! Waste not, want not!
How to measure your sourdough starter by volume for consistency in a recipe.
Always stir your sourdough starter down to release trapped gas!
Here is why:
One cup of active, bubbly, 100% hydration sourdough starter weighs approximately 165 grams.
One cup of flat, fully fermented, 100% hydration sourdough starter weighs approximately 250 grams.
This is a noticeable difference and the reason why all sourdough recipes should use a common hydration percentage, be stirred down before measuring, and be weighed for accuracy.
Sourdough Hydration Explained
Sourdough hydration refers to the moisture content (by weight) of the starter or dough.
A 100% hydration starter is equal weights of flour and water.
A dough that is 75% hydration is very easy to handle and the basic ratio would look like this:
400 grams flour (100%), 300 grams water (75%).
Converting Your Pre-Existing Sourdough Starter To 100% Hydration for Ease of Use
A 100% hydration sourdough starter is quickly becoming my standard measurement. Once your starter is the exact hydration percentage you can feel very confident in the recipes provided here.
To convert your starter mix 100 grams of flour and 100 grams of water together into a thick paste. Add 20 grams of your sourdough starter and let it ferment. For future feedings always use equal weights of flour and water and you will keep your starter at 100% hydration.
Feeding Your Sourdough for Successful Baking
Learning how to feed your sourdough starter and understanding the optimal time to use it will ultimately make you a better baker. I wrote a post all about feeding sourdough starter. Find it here – How To Feed Your Sourdough Starter for Successful Baking
Helpful Conversions
I definitely recommend you use a scale for the accuracy of weighing ingredients. But if you don’t have access to a scale here are a few beginning conversions that can help get you started.
Reader's Top Ten!
My most popular recipes ranked from 10 to 1.
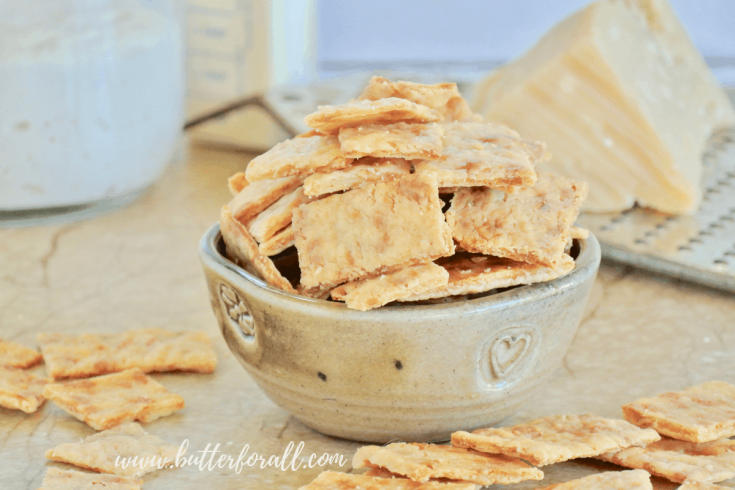

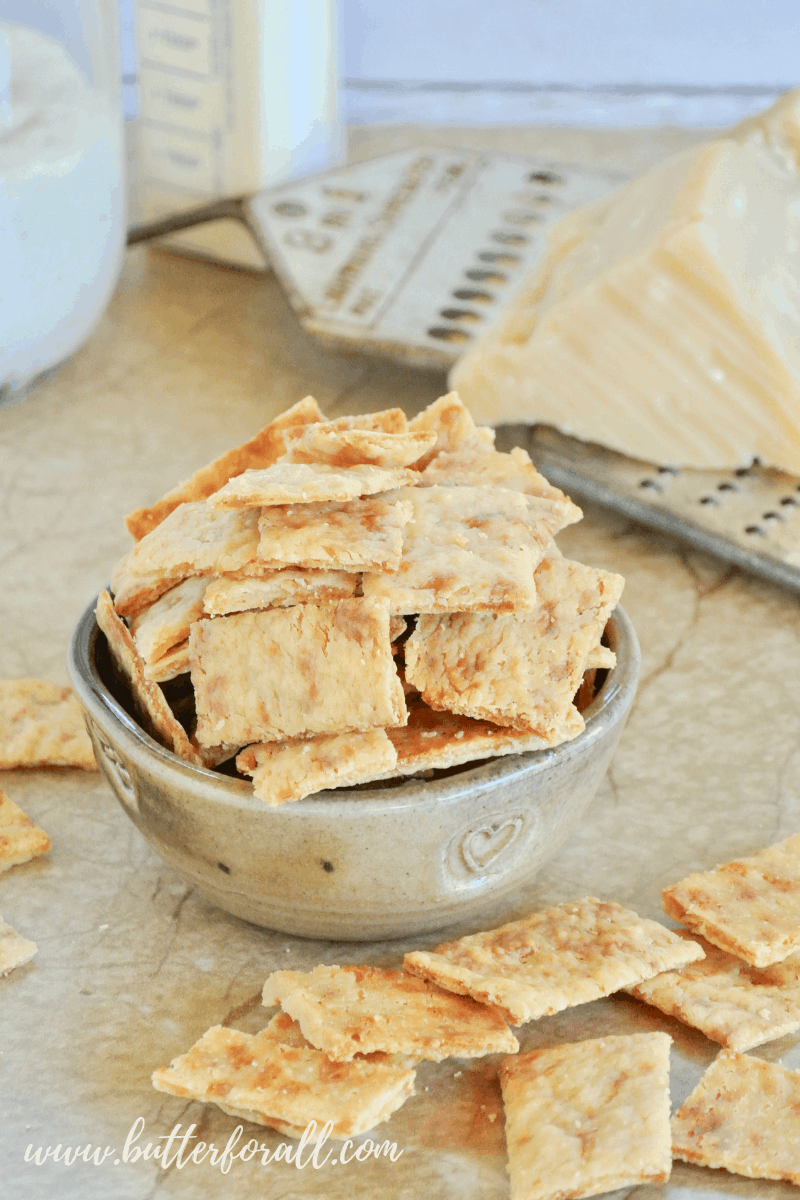
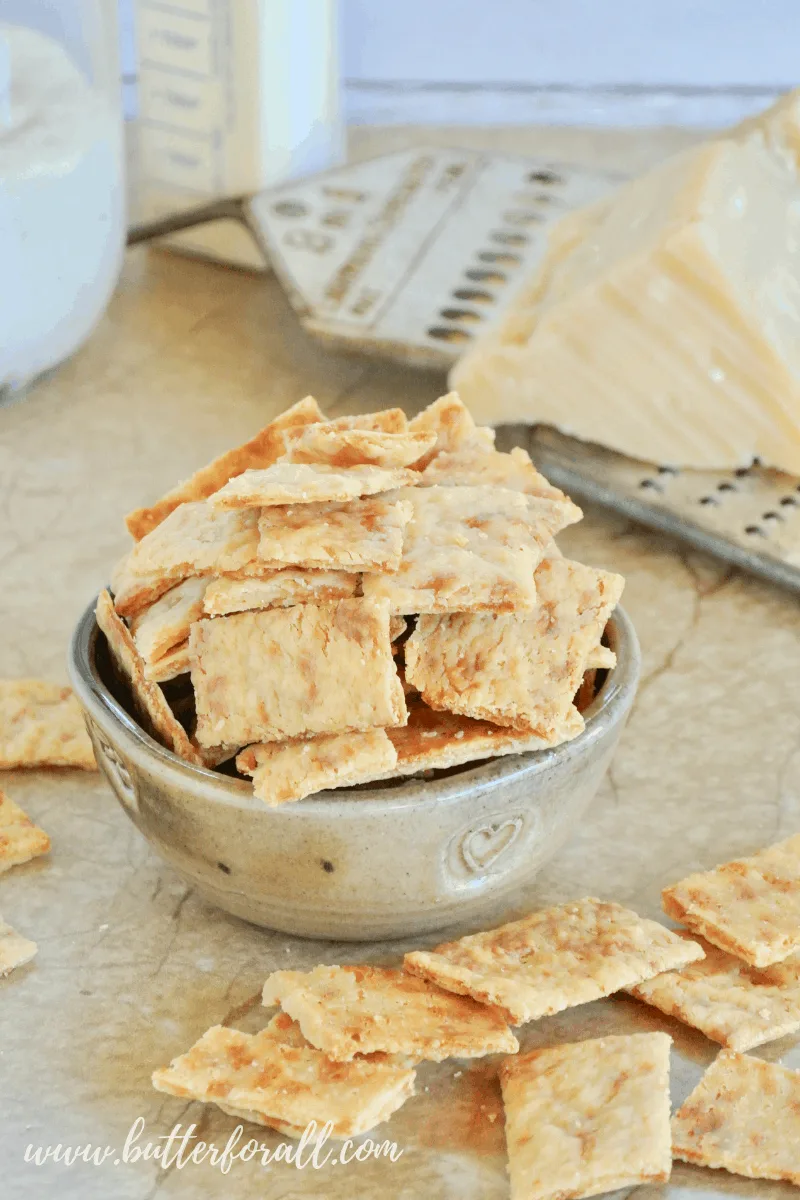
A crispy, cheesy, fermented sourdough snack cracker.

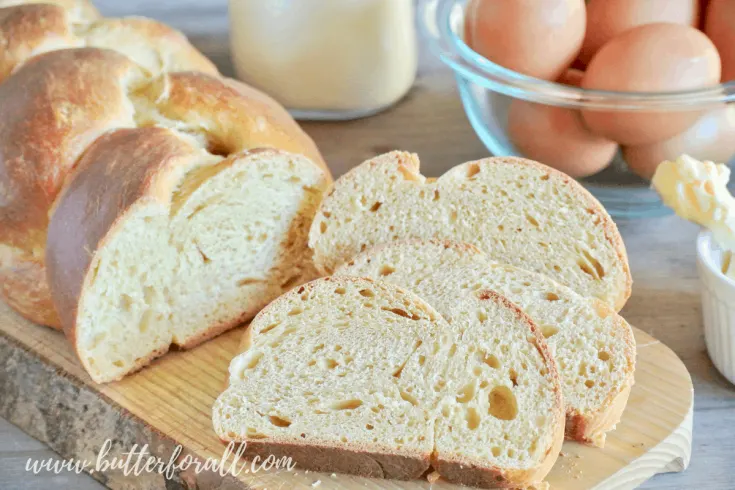
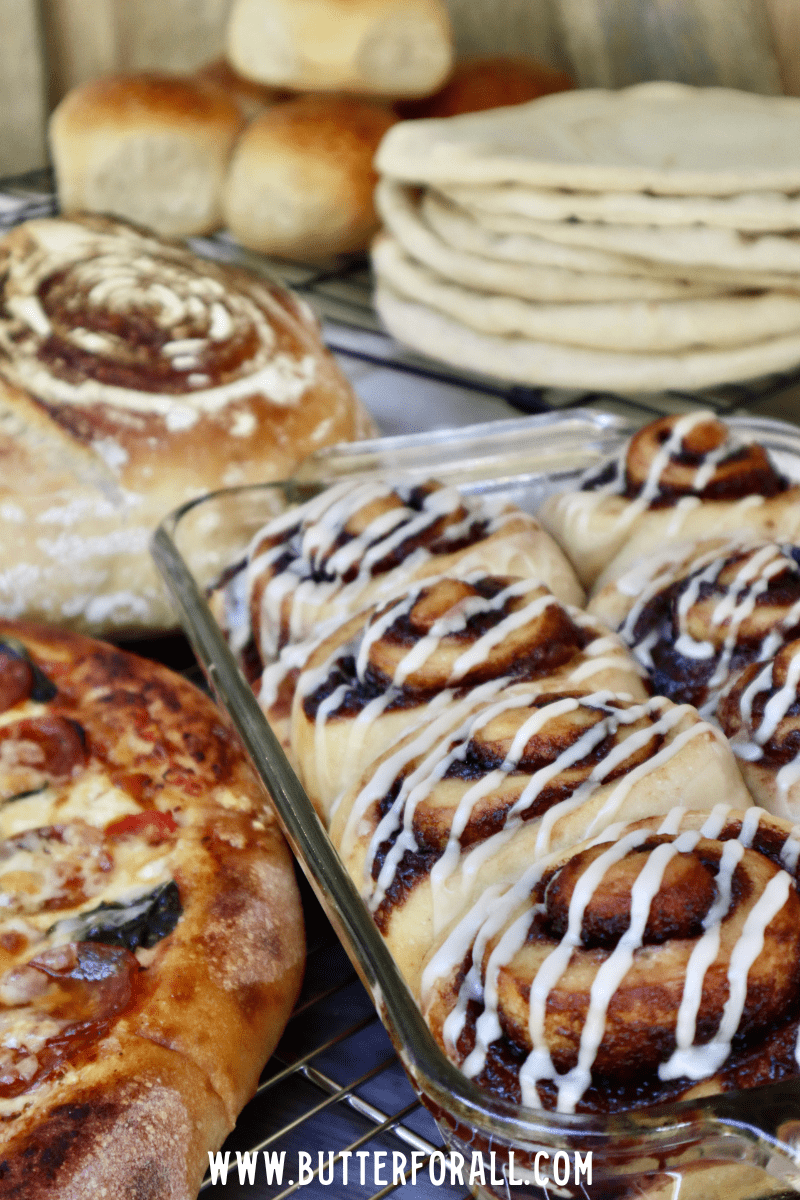
The perfect multipurpose rich dough for challah, rolls, buns, pastry, brioche, and more!

A sweet and soft sourdough bread with rolled grains and honey. This bread makes wonderful toast and incredible French toast!
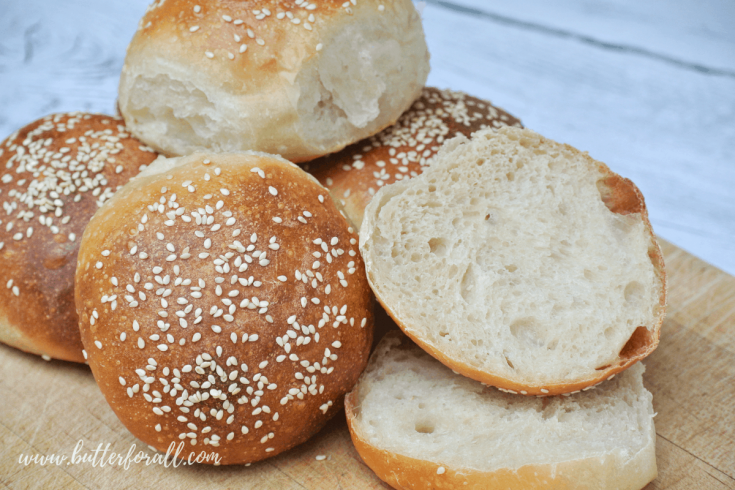
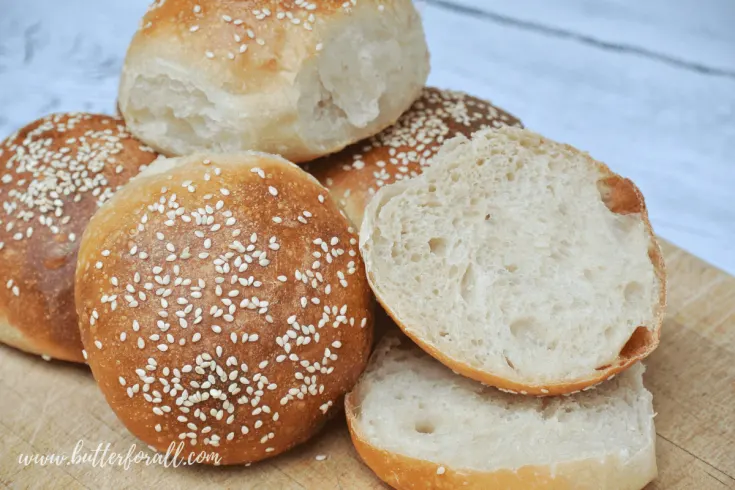
Recipe yields 6 big buns (perfect for 1/3-pound burgers) or 8 medium-size buns (perfect for 1/4-pound burgers).

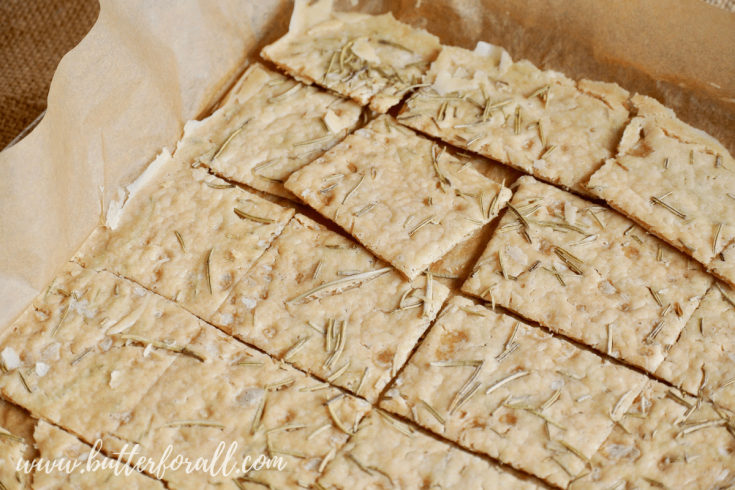
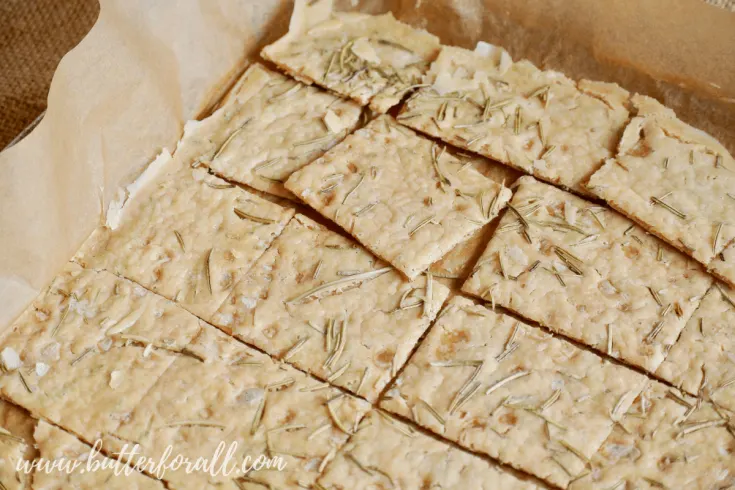
The lightest and crispiest sourdough discard crackers with the best flavor.
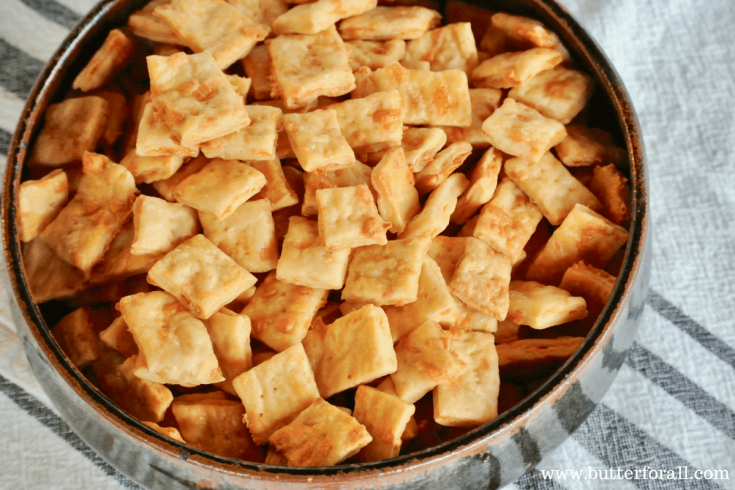

A crunchy, tummy-friendly, fermented grain snack cracker.


An easy to work with, traditional sourdough English muffin, perfect for holding a variety of toppings (like butter!)
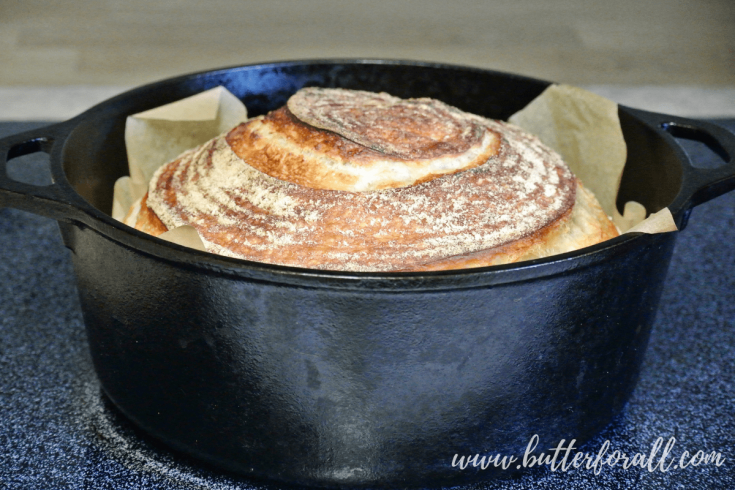

Learn how to bake a big and beautiful loaf of real sourdough bread. This formula yields a soft and pillowy crumb perfect for slathering with real butter!
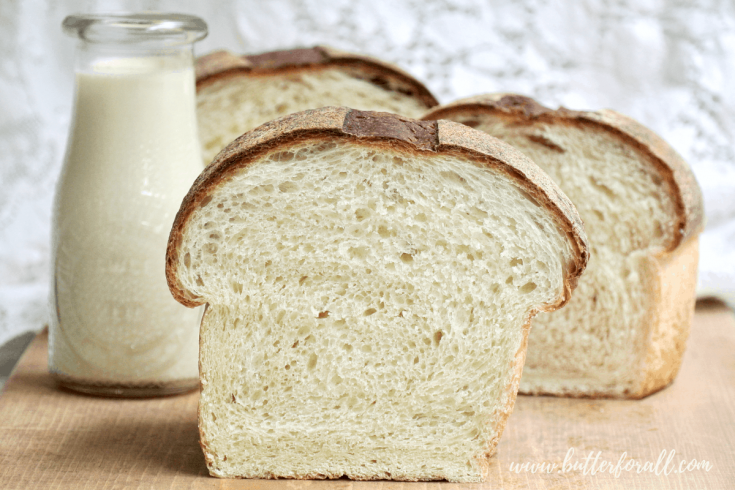

This soft sourdough milk bread is lightly sweetened with honey for the perfect balance of flavors!
More recipes in the Sourdough Archives!
Troubleshooting Your Sourdough Starter
There are no bubbles in my starter –
- Your starter probably needs to be fed. Yeast can only produce carbon dioxide if it has a source of sugar to consume. Feed your starter with equal weights of flour and water.
I fed my starter and there are still no bubbles or rise –
- If your starter is new, continue to feed it based on the timeline instructions above. Hopefully within 14 days you will see signs of the yeast and bacteria colonizing and becoming stronger and more active. If the starter has been refrigerated for a long period it may take several feedings to “wake up.”
There is mold on my starter –
- Unfortunately mold spores can contaminate a starter through the flour, water, or air. In this case, it is best to discard the contaminated starter, sanitize all sourdough utensils thoroughly, and replace it with a fresh starter. Keep your new starter as active as possible. The production of acids in the fermenting process will prohibit mold growth.
- The Healthy Sourdough Starter Series, Episode 1: Mold
There is grey or brown liquid on the top of my stater –
- This liquid is called “hooch.” It is a byproduct of an underfed, over-fermented starter. It will smell strongly of alcohol and while unpleasant in appearance, it cannot hurt you. You can pour it off and discard half of your starter before re-feeding or stir it back into the starter for a very strong sour flavor.
- The Healthy Sourdough Starter Series, Episode 2: Hooch
My starter smells like alcohol –
- When all the sugars in the flour have been consumed the acids will start to become alcoholic. A starter that smells strongly of alcohol needs to be fed! Feed your starter with equal weights of flour and water.
My starter is bubbly but it won’t rise bread –
- In the early stages of sourdough baking this can be a real problem. It happens to all of us. A sourdough starter needs to be used often, fed often, and kept at a warm room temperature.
- Double feed your starter for three days.
- Make sure to remove starter every time before feeding. This will give the remaining yeast more food sources and encourage the strong yeast to multiply.
- Make sure you’re storing your starter in a warm environment that encourages the fermentation process. If you keep your house cool, try placing your starter or bread dough in the oven with the light on.
Troubleshooting Your Sourdough Bread Dough
My dough is too sticky during the mixing stage –
- Is your starter 100% hydration? If not, it may have a higher hydration than the recipe that you are trying to duplicate. Double-check the recipe instructions to find out if you are supposed to have a starter or leaven at a specific hydration. Most of my recipes call for starter at 100% hydration. Go to Page 8 of this guide for more on hydration levels.
- Sticky dough is often a sign of an immature sourdough starter. If it seems like it stays sticky for more than 2 hours, even after kneading or shape and fold, and it is not developing gluten or starting to rise, then you need to work on your starter. Make sure you feed your starter 4 to 8 hours prior to baking. It should double or triple in volume during this time. If it does not double or triple, start discarding and feeding that baby every 12 hours until it does! Go to page Page 8 for more on feeding starter.
My bread was rising fine but became very sticky and hard to work with at shaping time –
- This could be caused by an overpopulation of bacteria that are souring your bread too quickly and breaking down gluten strands in the process. We strive for a balance between yeast and bacteria, but often, especially with starters that don’t get used regularly or are young and underdeveloped, the bacteria is out-competing the yeast for sugar. The result is a sloppy, over-proofed mess at shaping time. To diagnose if the bacteria are out-competing the yeast pay close attention to your starter. If it smells or tastes very sour, develops hootch, or won’t rise within 4 to 8 hours there is a good chance your yeast strains are weak and the starter needs work. To remedy this problem feed that starter every 12 hours until it is doubling within 4 to 8 hours consistently!
- If your bread had a good rise and is still holding gas but got sticky while shaping, then it may be overworked. All bread dough requires a very gentle touch at this stage. If you break the gluten strands at the shaping stage by overworking the dough it will get sticky, flatten out in a blob, and won’t look smooth. To avoid this problem pull the dough gently when shaping, just barely stretching it; if it starts to tear you are overworking it. If you feel like you didn’t get it tight enough, don’t worry about it, there is always next time. A gentle touch and smooth dough will always rise better than one that has been overworked with broken gluten.
I need to fix my overworked dough –
- Gather the dough back into the bowl and let it rest for at least 1 hour or until you see it start to rise again. At this point, turn the dough out on a lightly floured surface and very gently and loosely shape the dough. Let it rest for 5 to 10 minutes and gently shape it a little more. If you even see one tear, STOP. Put the dough in a floured banneton or loaf pan and let it proof again either at room temp or in the refrigerator as the recipe instructs. This might not be your best shaped loaf, it’s ok, this is how we learn to handle the dough!
Watch the way I handle the dough in this video:
Adjusting Sourdough Recipes, Substitutions, and Conversions
You will inevitably come across recipes you want to try but won’t have the exact ingredients on hand. It’s ok! Sourdough is very versatile — you just need to follow a few simple rules and your baking intuition.
Rule #1. Not all wheat flour behaves the same –
That doesn’t mean that you shouldn’t experiment with fancy heirloom flours, freshly milled grains, or fun additions. It just means don’t expect the same results that the recipe shows if you adjust and substitute ingredients.
Heirloom grains may need more or less liquid hydration depending on the variety. So if you are substituting a different flour than what the recipe calls for, always start with 75% of the liquid and see how the dough feels. You can always add more hydration if you need to.
Rule #2. Whole grains won’t rise quite as much –
This is due to the way gluten in flour works. Gluten is long strands of protein that trap carbon dioxide. If there is bran from the outer husk of the grain in your flour it will disrupt those long gluten strands, making them shorter and resulting in a more dense bread.
Don’t expect a light, lofty, open crumb when you use more than 50% whole wheat.
Rule #3. Adjust recipes with texture and hydration in mind –
Once you’ve made a few loaves of well-developed bread you will start to identify the texture of a properly hydrated flour. In my experience, when fully mixed and kneaded, sourdough bread dough will be tacky to the touch but not overly sticky (unless the recipe says it should be as with my English Muffins). If you have lots of whole grains or rolled grains in the dough then you can get away with a tad more hydration as some of that will get soaked into the grains during the bulk ferment.
Rule #4. Always use your intuition –
Good bakers rely on their senses because they know that ingredients, temperatures, and conditions change. So always pay close attention to the little details like how your starter behaves, how your bread rises, how long it takes for the starter and dough to double, how fast it browns in the oven at different temperatures, how long it takes to bake through, what flours you like, and so on. If you pay attention to all the details like this you will have a deep understanding of your sourdough starter and that will give you a thorough knowledge base for your intuition to draw from.
Rule #5. Don’t be afraid to fail –
Sourdough baking is so much trial and error. Not every recipe will work. Sometimes you won’t get consistent results. But if you keep working at it I guarantee that after some practice you will develop your own style of baking and you will make wonderful nourishing sourdough bread!
Need More Help?
I am now offering private or business consultations via Zoom. Email me at courtney@butterforall.com for rates and to schedule a face-to-face meeting where I will personally answer all your questions!

Having a Sourdough Insurance Policy
S*** happens, let’s face it. It’s best to always have a sourdough insurance policy!
Sourdough starters can get thrown away by well-intentioned family members, house cleaners, or guests.
They can get contaminated by mold, unhealthy bacteria, fruit flies, or chemicals.
They can get forgotten in the back of the fridge for years, left out until rock hard, or accidentally cooked in preheating ovens.
I guarantee that at some point in your sourdough journey you will have a close call with your starter.
Here is your insurance policy!
Dehydrated Starter – Once your starter is active and producing wonderful baked goods you can dehydrate that active starter and keep it indefinitely in an airtight storage container. To do so, spread one cup of sourdough starter as thin as possible on a large sheet of parchment paper. Lay the paper on a baking sheet and dry the starter in a warm place (the oven with the light on works well) until no moisture remains. Or use your dehydrator on the lowest setting. Once the starter is completely dry you can break it into small pieces for storage.
To use dehydrated starter – Make a slurry of 20 grams of flour and 25 grams of water. Add 5 grams of dehydrated starter and let it rehydrate for 8 to 12 hours in a warm place. Feed your starter every day after until it is strong and active and ready to bake with.
Recipes That Use Pre-Made or Leftover Sourdough Bread
Sometimes I’m baking so much that there will be leftover bread from the previous loaf. When this happens I just throw the heels and leftovers in a bag in the freezer. Every time I have an old piece of bread I add it to my freezer stash. I use this leftover bread to make bread crumbs!
To Make Bread Crumbs – Spread out the frozen heels and leftover pieces of bread on a baking sheet and defrost them at room temperature. It’s ok if they dry out a little, in fact it is better. That is why I always freeze the bread prior to making crumbs. Frozen bread is always drier after being defrosted.
Tear the defrosted bread into bite-size chunks and place them in your food processor. Pulse the food processor until the crumbs are small and uniform in size. For stuffing or dressing you can leave the crumbs larger, but if you want to use the crumbs like panko make sure they are small and uniform.
Bread Crumb Recipes


No need to feel guilty about these chicken strips, they are made with real whole food ingredients and fried in healthy avocado oil.
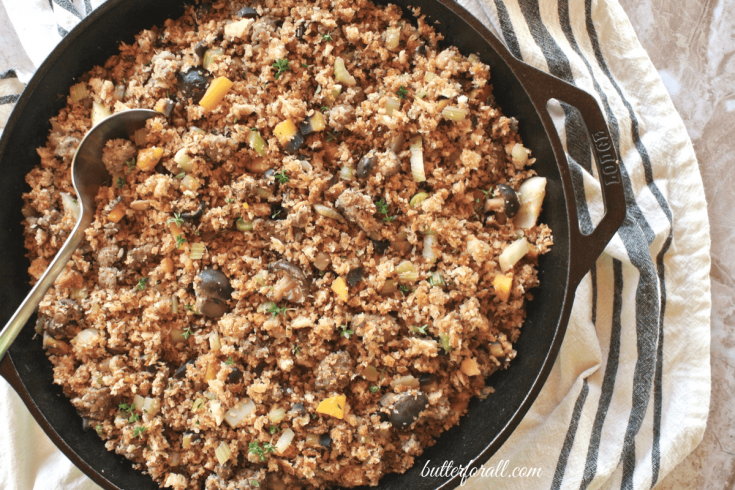
Sourdough bread makes the best stuffing for your nourishing holiday meal!
Now you know everything I know about sourdough!
I hope you get inspired to start baking this healthy and time-honored style of bread and baked goods. Please feel free to leave a comment, ask a question, or email me to chat about sourdough!
My Favorite Sourdough Recipes
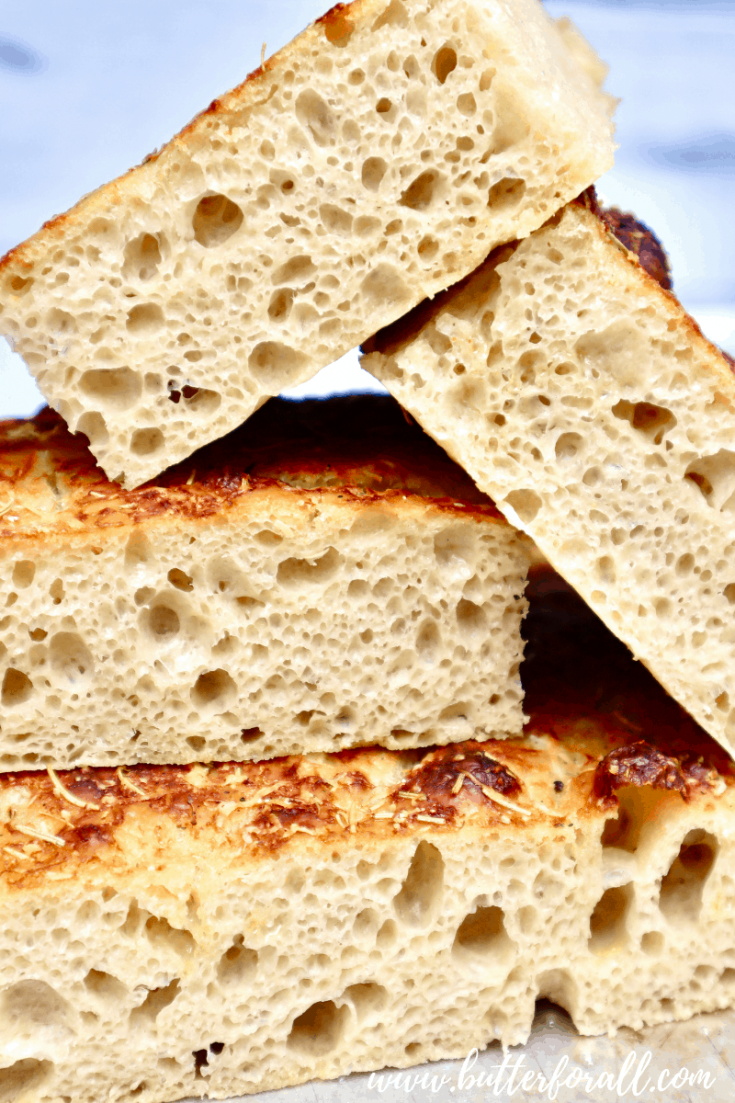

This traditionally leavened sourdough focaccia is super soft and pillowy, perfect for dipping in oil and vinegar, making sandwiches, or baking with toppings or add-ins!


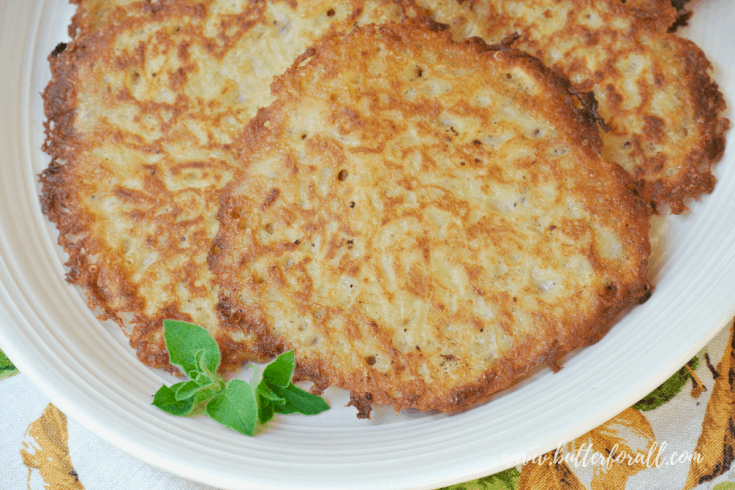

An easy overnight batter that is then mixed with fresh shredded potatoes and spices for a perfect fermented potato pancake!


The perfect soft and chewy all-purpose sourdough pizza crust for weeknights or pizza parties.


A very easy fermented wheat recipe that yields soft, tender, and sweet banana nut muffins.

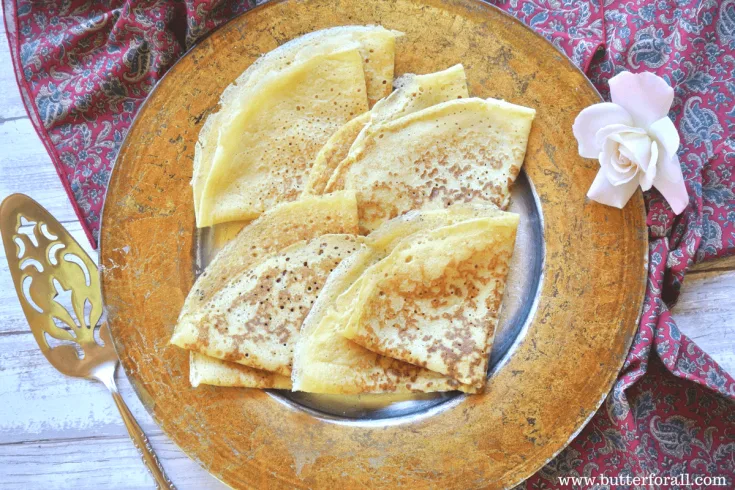
The perfect, traditionally fermented crepe base for sweet or savory toppings, fillings, and sauces!

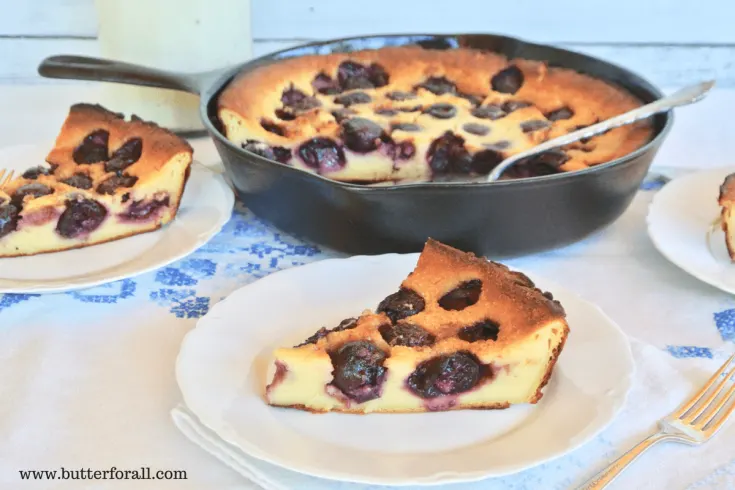
A classic black cherry clafoutis, but made with whole-body-friendly fermented grain.


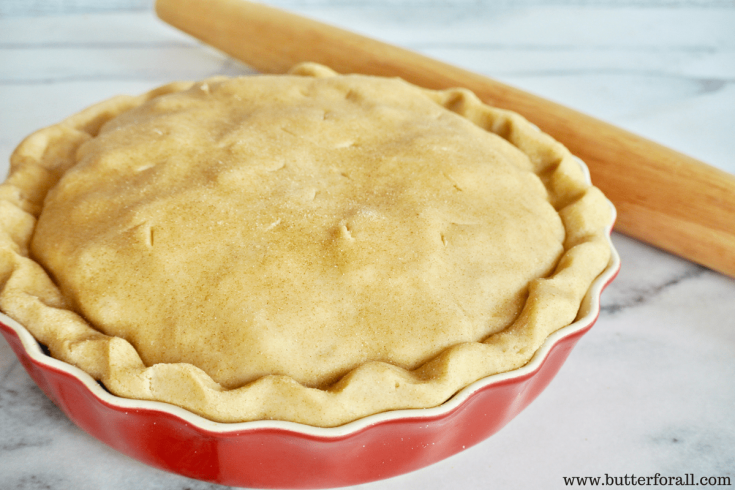
The perfect handheld pie recipe, great for kids, parties, gatherings, and snacking!

Super soft, sweet, and earthy sweet potato sourdough bread.

This Cheesy Sourdough Pizza Bread takes pizza bread to a new level. Favorite toppings like artichoke hearts, garlic-stufffed green olives, and fresh cheese curds make every bite a delight. Not to mention the dough undergoes a long fermentation, making it extra easy to digest!
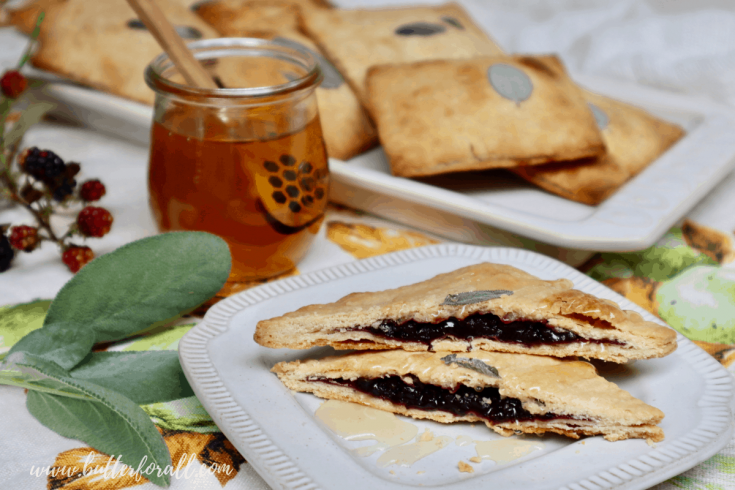

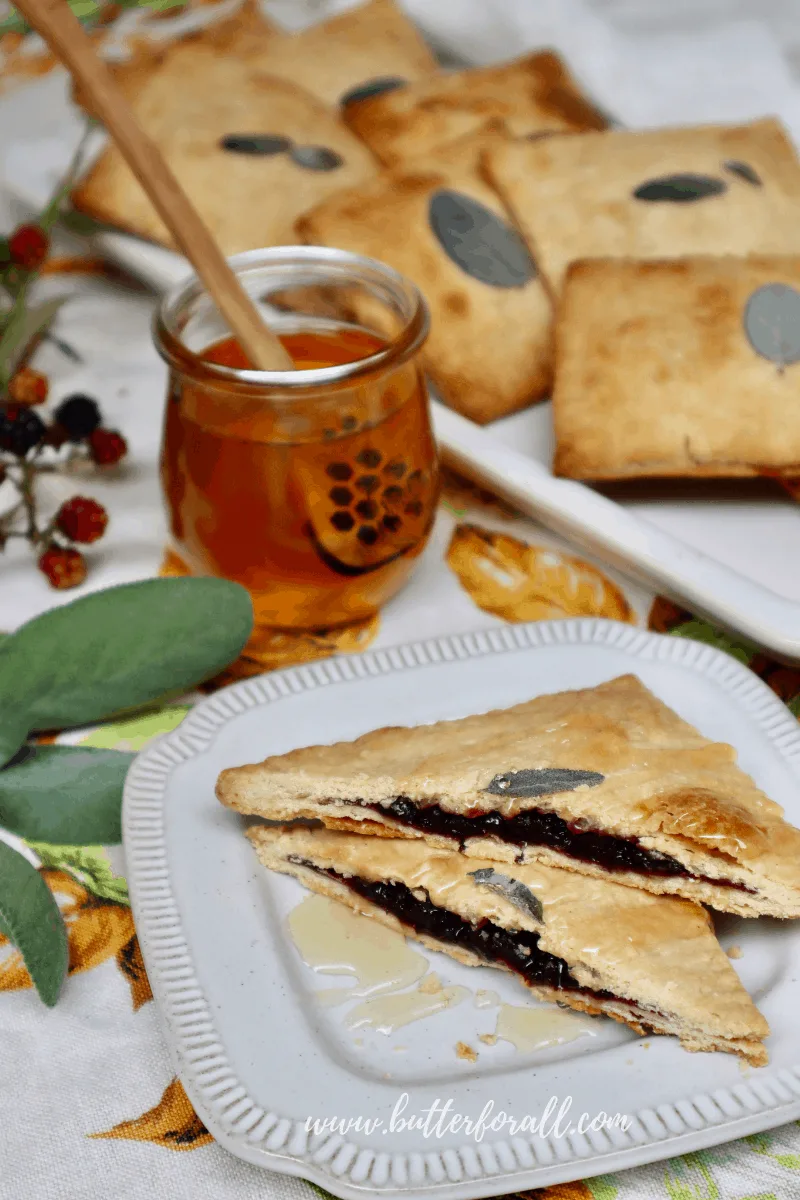
This grown-up, magical toaster pastry is made with real fermented sourdough pastry crust and a thick honey-sweetened blackberry filling scented with fresh sage. Serve them for a delightful brunch, dessert, or quick snack on the run! These versatile hand-held pastries can be frozen easily and then reheated in a jiffy. Kids will love these toaster tarts too!

A fluffy, super soft, and chewy sourdough bagel. These fully fermented bagels are boiled and baked for the best crust, taste, and texture possible.


Sourdough dumplings are extremely easy to make with fresh sourdough starter or sourdough starter discard. They have a great chewy texture and pleasant, slightly sour flavor. When boiled in broth or liquid, they become light and fluffy, perfect for a refined chicken and dumpling soup!

A generous percentage of low-gluten Kamut flour gives this sourdough sandwich loaf a distinctive golden-brown-and-buttery flavor. The addition of milk and honey keeps the bread soft and even, perfect for slicing for sandwiches, toast, or French toast!
Memorize this simple formula and you'll always have a sourdough recipe on hand that can make great bread, pizza, pitas, hamburger buns, cinnamon rolls, and more.
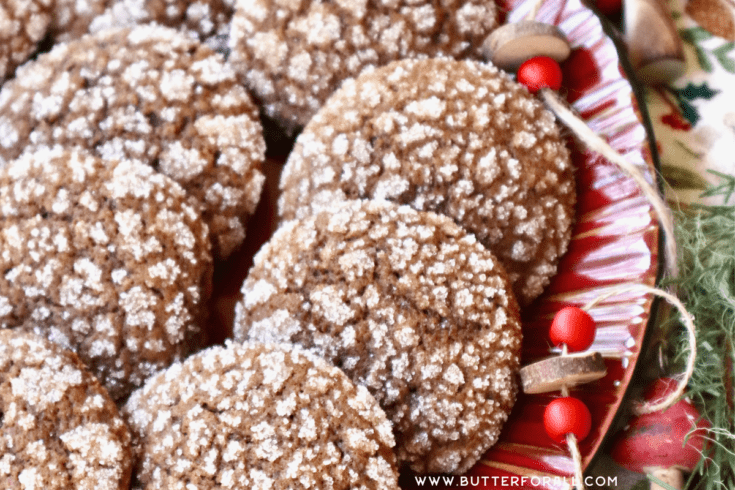

A soft, spiced molasses cookie with a crunchy sugary top.

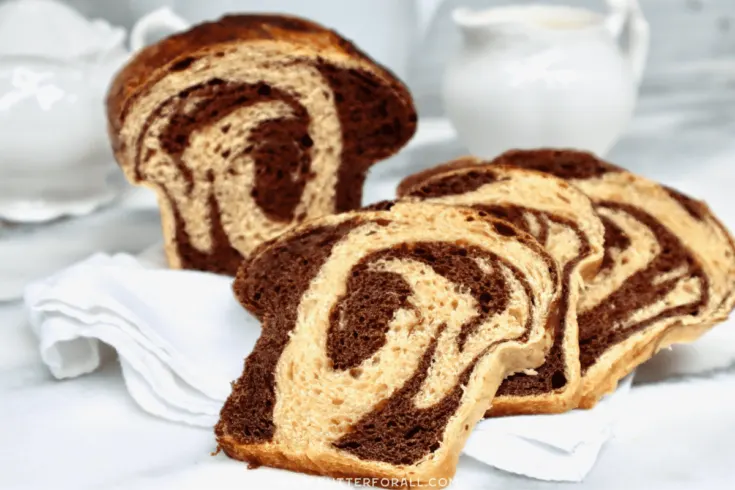
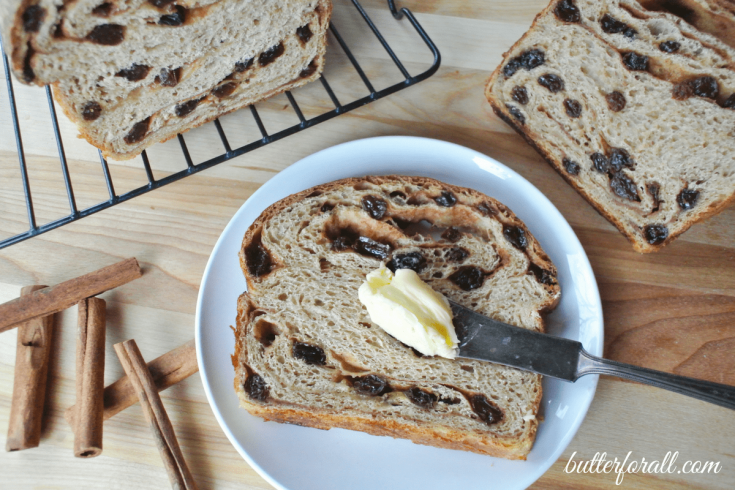
The deep chocolate aroma and gentle earthy sweetness of this sourdough Dutch chocolate swirl bread will entice you every time. Sit down with a warm cuppa and indulge in a truly blissful bite. Definitely try this bread as French toast. I promise you won't be sorry you did.

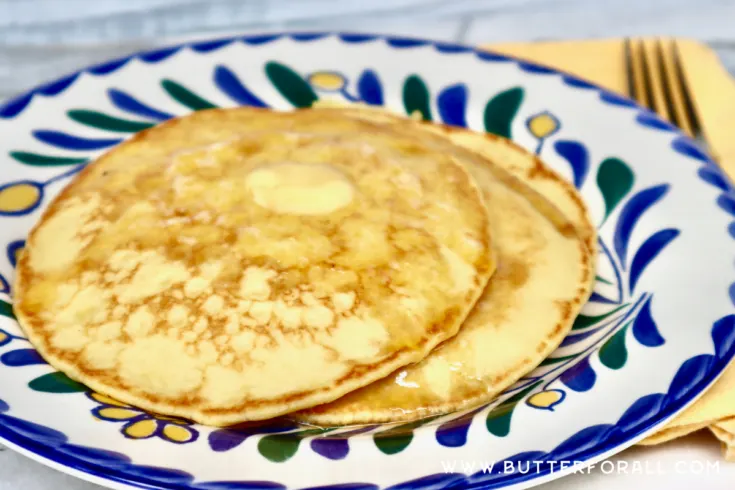
These tender and flavorful einkorn pancakes will become a favorite from the first bite.
Shannon
Saturday 11th of January 2025
Can I use fresh ground Farro, or Buckwheat for the starter? Suddenly I can't find wheat berries at store...
Butter For All
Tuesday 14th of January 2025
Hi Shannon, You can use freshly ground Farro. It is a variety of wheat, but buckwheat is not wheat and will not develop gluten. Buckwheat also tastes very different/very sour when fermented.
Amy
Saturday 16th of December 2023
Hi Courtney, I have seen others use one type of flour to initially start their starter & then feed it with another type. Why is that? I have a local grain mill near me and purchased their high-protien bread flour that they sell to bakeries. That should be okay to start and feed my started, right? Thanks!
Butter For All
Saturday 16th of December 2023
Hi Amy,
A whole grain flour is usually recommended for starting a starter because it has more bran and husk distribution throughout the flour. The bran and husk are where wild yeasts and bacteria can be found naturally. While the plant is growing they settle on the outside of the grain so when that is milled away a lot of the yeast is lost. Whole grain flour also has more minerals that the yeast like when they are getting established. It may take longer to start a stater with white flour, but you can also just by a small bag of local whole wheat and add a few small scoops every time you feed. The whole grain will help yeast take hold, while the white flour will supply the simple sugars the yeast love!
I wish you tons of success!
Courtney
Cathleen
Saturday 25th of February 2023
What is the difference between bread flour and home ground 100% wheat flour? Thank you for your help.
Butter For All
Monday 27th of February 2023
Hi Cathleen!
Bread flour is in most cases a hybridized wheat with a high protein content. Typically it is either sifted or hulled to remove the outer bran and keep the soft, white, inner starch. The high protein content translates to higher gluten development and a more open crumb structure.
Home ground wheat flour can be any wheat variety you choose, but it will have 100% of its hull ground into the flour. So it will have more vitamins and minerals, more flavor, translating to a higher chance of spoilage due to the increased oil content, and more anti-nutrients that will need to be taken care of with soaking, sprouting or souring. It's best to keep whole wheat kernels and fresh ground flour in the refrigerator or freezer. Or only grind as much as you can use in a few days. Whole wheat flour will create a bread that is much more dense with less gluten development, but a lot more flavor and nutrition.
I hope that helps!
Courtney
Ella
Wednesday 22nd of February 2023
Hello Courtney, I started my sourdough starter journey last week. I used day 1 50g of whole wheat flour and 50g water, day 2,3 and 4 i used ratio 1:2:2 (25g starter, 50g flour and 50g water). It was doing very well day 2 (almost rised twice by 24 hours), day 3 rised less but bubbles were there, day 4 the same. Am I feeding it too much? You have a different ratio in your recipe - 50g starter, 25g flour and 25g water. Temperature in my kitchen is between 70-72 degrees
Thank you for your advice! Ella
Butter For All
Monday 27th of February 2023
Hey again! I answered you in the previous question, but I will say that the temp could be increased to really favor the yeast. Check out the temperature inside your oven with the light on. If it's between 80-95℉ you could keep your starter in there while it becomes established. If it's too warm in the oven, try cracking the door to see what temp the oven stays at.
Ella
Wednesday 22nd of February 2023
Hello Courtney, I started my sourdough starter journey last week and I'm on day 4 now. It rises less then before and it troubles me. I used 50g whole wheat flour and 50g water 1st day. Next days I used ratio 1:2:2 (25g starter, 50g flour and 50g water). I noticed that you used a different ratio in your recipe - 50g starter, 25g flour and 25g water. Am I giving him too much in my feedings?
Thank you, Ella
Butter For All
Monday 27th of February 2023
Hi Ella!
Sorry for the slow reply I recommend a 1:2:2 ratio for reviving a dehydrated starter, but for starting a starter from scratch, I like a 2:1:1 ratio. This ensures the yeast (who may be struggling to reproduce quickly) aren't getting overly diminished with each feeding. It's really very normal for you to see a big rise in the first day or two when the bacteria isn't as established, followed by a slower period of yeast growth as things start to balance out and the lactic acid starts to build. The yeast have to adjust to this new acidic environment. Hopefully you kept going and are starting to see some consistency with rising. I think you could continue with a 1:2:2 ratio (there is no definitive ratio) or try reversing it to see what works best in your situation. I hope you'll follow up to let me know how it goes!
Best of luck,
Courtney