I may receive commission if you purchase through links in this post.
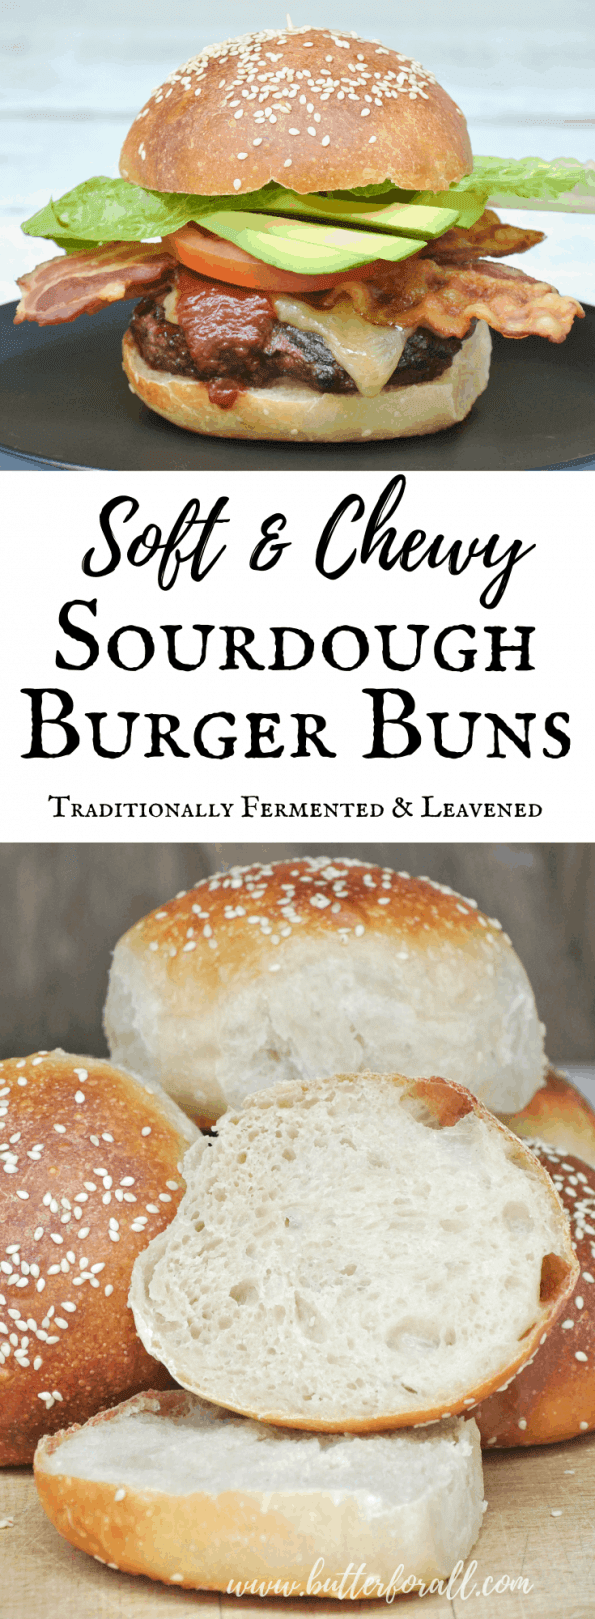
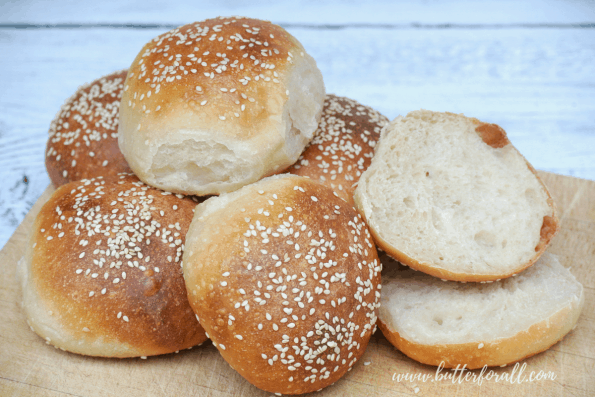
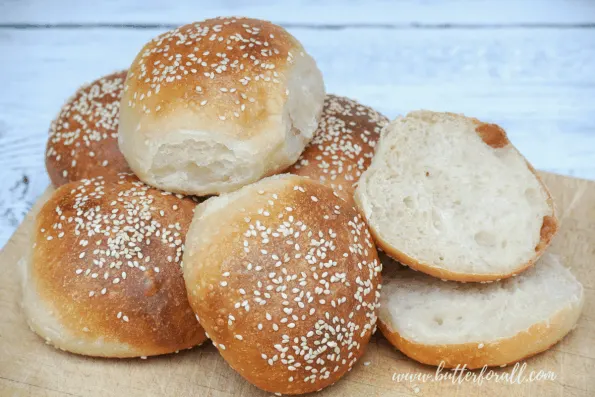
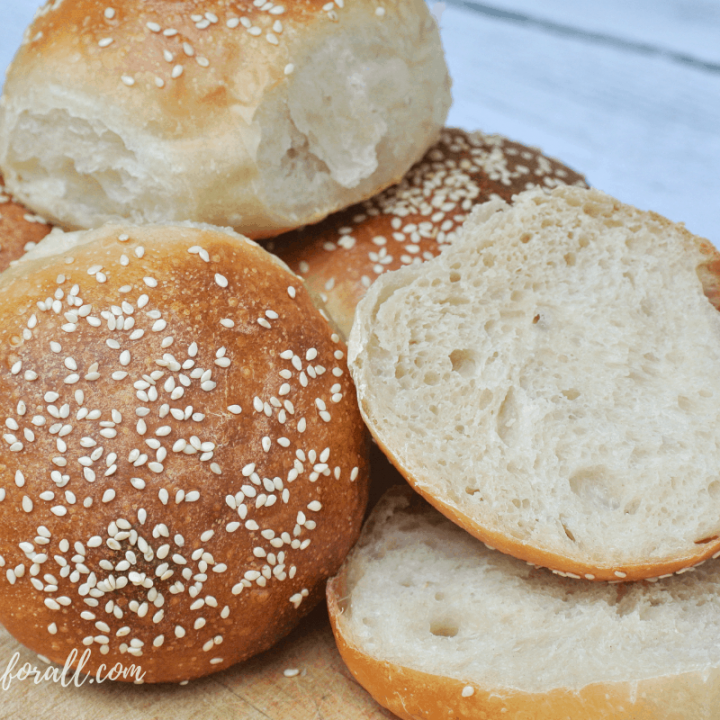
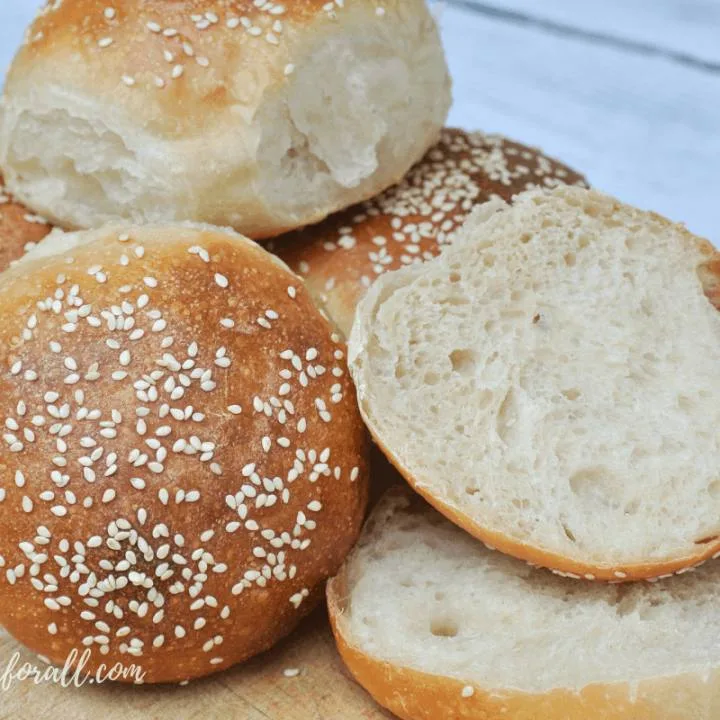
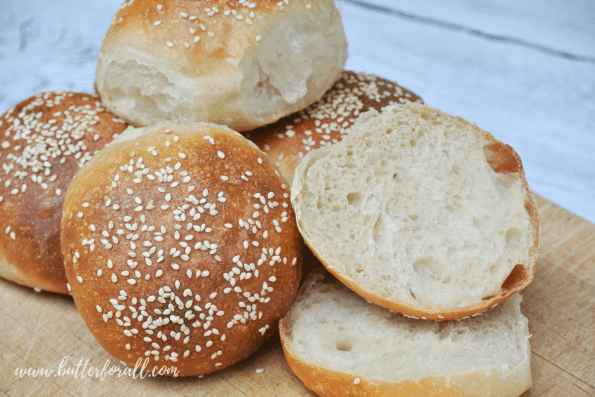
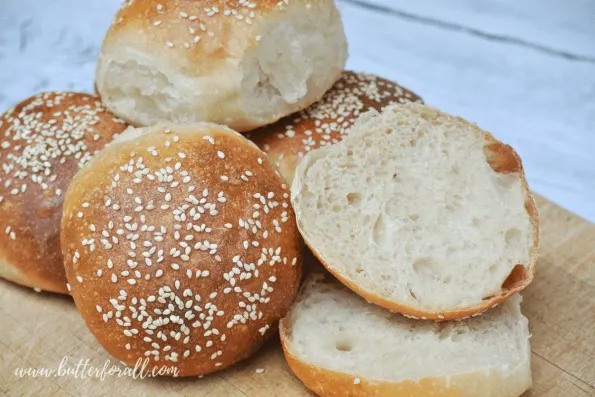
A sourdough burger bun so satisfying you won’t ever go back to store-bought!
I’m really excited to share this recipe with you! I’ve been working on burger buns for years now and I think I’ve finally nailed it.
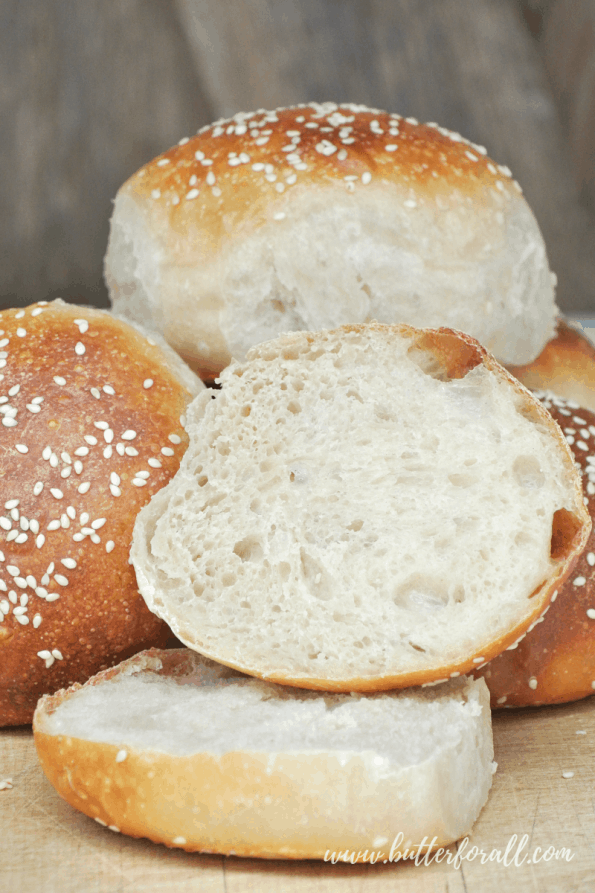
This bun is soft and chewy, making it perfect for holding lots of toppings. It won’t break or crack under the weight of a hefty, loaded burger like the dry store-bought buns do.
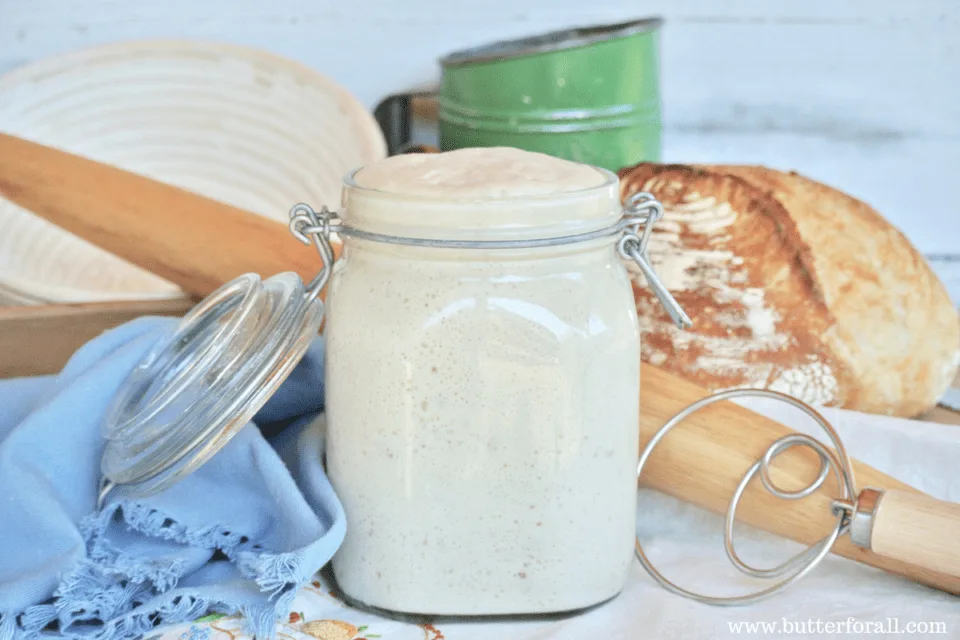
Sourdough is classically stretchy and this bun recipe is no exception. And like all my sourdough, it is traditionally leavened during two long, slow ferments. Two long ferments means better digestibility, more unlocked nutrition, and great “real sourdough” flavor.
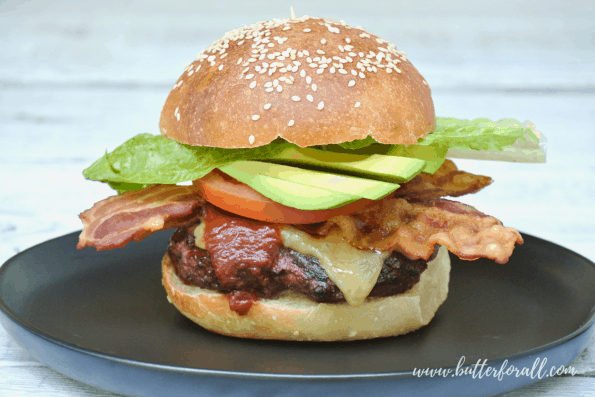
If You’re Like Me You’re Always Looking for a Place To Get a Really Good Burger.
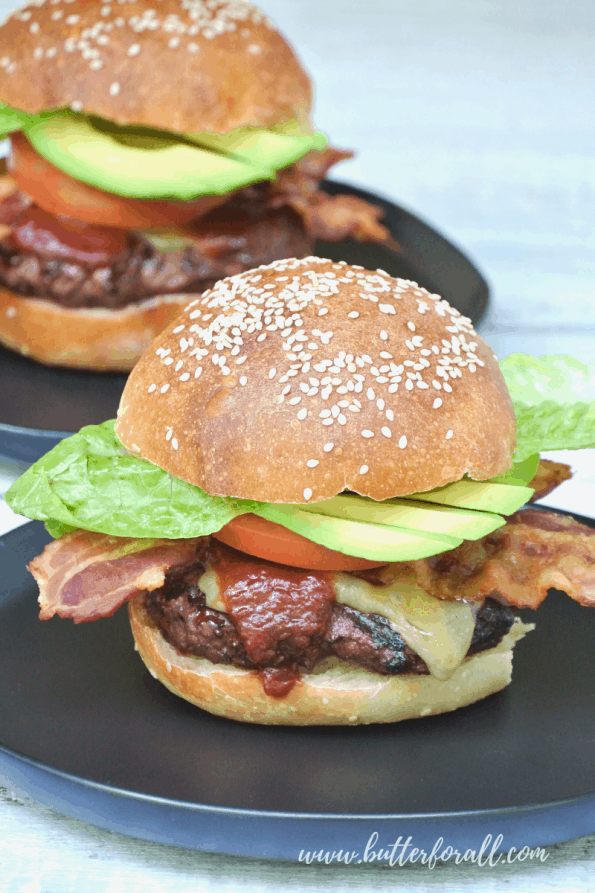
But the truth is a really good burger starts at home with grass-fed meat from a sustainable farm, organic produce, and a real sourdough bun. So ditch the restaurant and make yourself the burger of your dreams!
Watch Me Shape and Bake This Recipe on YouTube
Soft and Chewy Sourdough Burger Buns
Yield: 8
Prep Time: 20 minutes
Cook Time: 30 minutes
Proofing: 12 hours
Total Time: 12 hours50 minutes
Recipe yields 6 big buns (perfect for 1/3-pound burgers) or 8 medium-size buns (perfect for 1/4-pound burgers).
In a stand mixer or a large bowl, mix the flour, salt, coconut sugar, starter, and water into a thick sticky dough. In a stand mixer, use a dough hook and knead the dough gently for 2 minutes. Stop the mixer and let the dough rest for 5 minutes. Do this for four to six rounds, just until the dough is well developed. If mixing by hand, stir the ingredients together with a dough whisk until incorporated. Let the dough rest for several minutes. With lightly wet hands, stretch and fold the dough four to five turns every 5 minutes for four to six rounds until it's smooth and stretchy. It should be fairly sticky. Cover the dough and let the dough proof overnight at room temperature (65 to 70℉).
The next morning
Deflate the dough by doing a round of stretch and fold in the bowl. Let the dough rest for 5 minutes.
Turn the dough out onto a floured surface.
Gently roll and pat the dough into a log. Cut the dough into six or eight equal portions. Working with one piece at a time, form nice tight balls of dough. Start by folding the top down to the center. Working clockwise with your right hand fold all the sides into the center and push them down firmly while turning the dough counterclockwise with your left hand.
After eight or so turns, the dough should feel tight and rounded. Pinch the bottom of the bun and roll it gently in your hands to further shape it. Place the buns on a sheet of parchment paper atop a baking sheet to help you transfer the buns to a preheated baking stone once proofed.
If baking on a baking sheet, proof the buns on parchment on the baking sheet — no need to preheat the baking sheet, in fact it might be wise to double the baking sheet to protect the bottoms from getting too dark.
Once all the buns have been shaped, cover them and let them proof again for 3 to 6 hours (the proofing time will totally depend on the climate, activity of the starter, and so many other factors). You want the dough to rise to at least double if not triple its original size.
Preheat your oven to 375°F. If using a baking stone preheat the oven with the baking stone inside.
Mix the egg yolk and milk together in a small bowl. Using a pastry brush, lightly coat the top of each bun with egg wash. Sprinkle the buns with sesame seeds.
Slide the parchment with buns on top onto the preheated baking stone. Bake the buns for 30 minutes. Remove them from the oven and from the parchment paper to a wire rack to cool. Let them cool completely before pulling them apart if they are touching.
Slice and top the soft and chewy buns with all your favorites! Enjoy your well-deserved burger!
Nutrition Information:
Yield: 8Serving Size: 1 grams Amount Per Serving:Unsaturated Fat: 0g
As an apprehensive newbie, this was the first sourdough recipe I ever tried. Three years on, and countless iterations and it has never failed me. (The only failure was mine when I totally forgot the dough and majorly over-proofed in the Australian heat🫠) Thank you for sharing your knowledge, and making bread baking so accessible to beginners!
Butter For All
Thursday 15th of August 2024
Hi Nicole!
What a beautiful testimonial. Thank you so much for coming back to the website and leaving such a thoughtful message. It really inspires me to know that people have been using my recipes for years with success! I appreciate you 😊
Diana
Sunday 12th of May 2024
And should I cover dough with plastic wrap, and then a towel while proofing? Don't want it to dry out.
Kate
Wednesday 16th of April 2025
@Butter For All,
Add this to the recipe please
Butter For All
Monday 3rd of June 2024
Yes, plastic wrap or a damp flour sack towel.
Diana
Sunday 12th of May 2024
I've got dough mixed up and it's 6:00. P.m. can I let it proof this evening, then put it in the fridge till tomorrow morning. Then pull it out to make buns?
Butter For All
Monday 3rd of June 2024
Hi Diana,
I'm so sorry for the slow response. You are absolutely right, that is the perfect way to adjust timing.
Bridgette L
Monday 22nd of January 2024
These are delicious! Do you have any advice for shaping these into hot dog buns?
Bridgette L
Thursday 1st of February 2024
The link helps a lot. Thank you!
Bridgette L
Saturday 27th of January 2024
Thank you! I made them this morning. I definitely need to work on my shaping skills because they are the most crooked hot dog buns I have ever seen in my life 😂 but they are delicious and I will be making more!
Butter For All
Wednesday 24th of January 2024
Hi Bridgette!
So glad you like them! This dough makes great hotdog buns. Weight the dough to 75g portions and loosely pre-shape into round buns. Rest the dough until it's relaxed, then flatten it slightly into a rectangular shape. Then as if you were shaping a mini baguette, fold the top third down and press with your finger tips to seal. Bring the ends in slightly and roll the top two thirds down over the final third. Then place the buns seam side down on a parchment lined casserole dish. Put them close enough together that they touch completely when fully proofed. That will keep the sides soft and make the buns easy to open. Proof normally and lightly egg wash before baking. Let me know how it goes!
Happy baking!
Gary
Saturday 18th of November 2023
This is a great recipe, they came out perfect. I did make two slight changes due to what was in my pantry at the time. Instead of Coconut Sugar I used Maple Sugar and instead of Sesame Seeds had to use Everything Bagel Seasoning.
They proofed well and baked up soft and held up to the burger. I made two of them into hotdog buns as well.
Thank you so much, I've made many of your recipes and they have all come out perfect.
Butter For All
Tuesday 12th of December 2023
Gary,
I'm so happy that this recipe worked perfectly for you! Sounds like you have a pretty good handle on sourdough and are able to make those substitutions without fear. That's such a huge part of becoming a successful baker, so well done! I hope you stick around. I'm planning on publishing some new recipes soon! Happy baking to you :-)


Nicole
Friday 9th of August 2024
As an apprehensive newbie, this was the first sourdough recipe I ever tried. Three years on, and countless iterations and it has never failed me. (The only failure was mine when I totally forgot the dough and majorly over-proofed in the Australian heat🫠) Thank you for sharing your knowledge, and making bread baking so accessible to beginners!
Butter For All
Thursday 15th of August 2024
Hi Nicole! What a beautiful testimonial. Thank you so much for coming back to the website and leaving such a thoughtful message. It really inspires me to know that people have been using my recipes for years with success! I appreciate you 😊
Diana
Sunday 12th of May 2024
And should I cover dough with plastic wrap, and then a towel while proofing? Don't want it to dry out.
Kate
Wednesday 16th of April 2025
@Butter For All, Add this to the recipe please
Butter For All
Monday 3rd of June 2024
Yes, plastic wrap or a damp flour sack towel.
Diana
Sunday 12th of May 2024
I've got dough mixed up and it's 6:00. P.m. can I let it proof this evening, then put it in the fridge till tomorrow morning. Then pull it out to make buns?
Butter For All
Monday 3rd of June 2024
Hi Diana,
I'm so sorry for the slow response. You are absolutely right, that is the perfect way to adjust timing.
Bridgette L
Monday 22nd of January 2024
These are delicious! Do you have any advice for shaping these into hot dog buns?
Bridgette L
Thursday 1st of February 2024
The link helps a lot. Thank you!
Bridgette L
Saturday 27th of January 2024
Thank you! I made them this morning. I definitely need to work on my shaping skills because they are the most crooked hot dog buns I have ever seen in my life 😂 but they are delicious and I will be making more!
Butter For All
Wednesday 24th of January 2024
Hi Bridgette!
So glad you like them! This dough makes great hotdog buns. Weight the dough to 75g portions and loosely pre-shape into round buns. Rest the dough until it's relaxed, then flatten it slightly into a rectangular shape. Then as if you were shaping a mini baguette, fold the top third down and press with your finger tips to seal. Bring the ends in slightly and roll the top two thirds down over the final third. Then place the buns seam side down on a parchment lined casserole dish. Put them close enough together that they touch completely when fully proofed. That will keep the sides soft and make the buns easy to open. Proof normally and lightly egg wash before baking. Let me know how it goes!
Happy baking!
Gary
Saturday 18th of November 2023
This is a great recipe, they came out perfect. I did make two slight changes due to what was in my pantry at the time. Instead of Coconut Sugar I used Maple Sugar and instead of Sesame Seeds had to use Everything Bagel Seasoning.
They proofed well and baked up soft and held up to the burger. I made two of them into hotdog buns as well.
Thank you so much, I've made many of your recipes and they have all come out perfect.
Butter For All
Tuesday 12th of December 2023
Gary,
I'm so happy that this recipe worked perfectly for you! Sounds like you have a pretty good handle on sourdough and are able to make those substitutions without fear. That's such a huge part of becoming a successful baker, so well done! I hope you stick around. I'm planning on publishing some new recipes soon! Happy baking to you :-)